About the ACS: The Airman Certification Standards (ACS) replaced the Practical Test Standards (PTS) and defines exactly what the DPE will evaluate. Each task has Knowledge, Risk Management, and Skills components. This guide focuses on the Skills standards — the measurable performance tolerances you must hit during the practical test. Click any maneuver to expand it.
Preflight & Ground Operations
- Inspect the aircraft using the POH/AFM checklist
- Identify all placards, markings, and required documents (AROW)
- Verify airworthiness — no visible damage, proper fuel/oil quantity and type
- Check all flight controls for proper movement and security
- Skipping items on the checklist rather than using it as a do-list
- Not sumping all fuel drains or checking both wings
- Forgetting to check aircraft documents (airworthiness certificate, registration, operating handbook, weight & balance)
- Not verifying control surface freedom of movement
Tip: DPEs look for systematic, methodical inspection — not speed. Use the actual checklist. Verbalize what you're checking. If you find a discrepancy, say so and explain how you'd handle it.
Takeoffs & Landings
- Rotate at Vr and establish Vy climb (±5 kts)
- Track runway centerline during takeoff roll
- Retract flaps at appropriate altitude and airspeed per POH
- Maintain coordinated flight throughout
- Premature rotation before Vr
- Drifting off centerline after liftoff
- Retracting flaps too early before positive climb is established
- Over-controlling during initial climb — small inputs needed
Tip: Call out your airspeed targets. "Accelerating through 55 knots, rotate." DPEs appreciate a pilot who verbalizes the procedure — it shows situational awareness.
64 free PPL ground school videos on YouTube. Also offers a premium interactive course at freepilottraining.net with 700+ practice questions and a written exam endorsement.
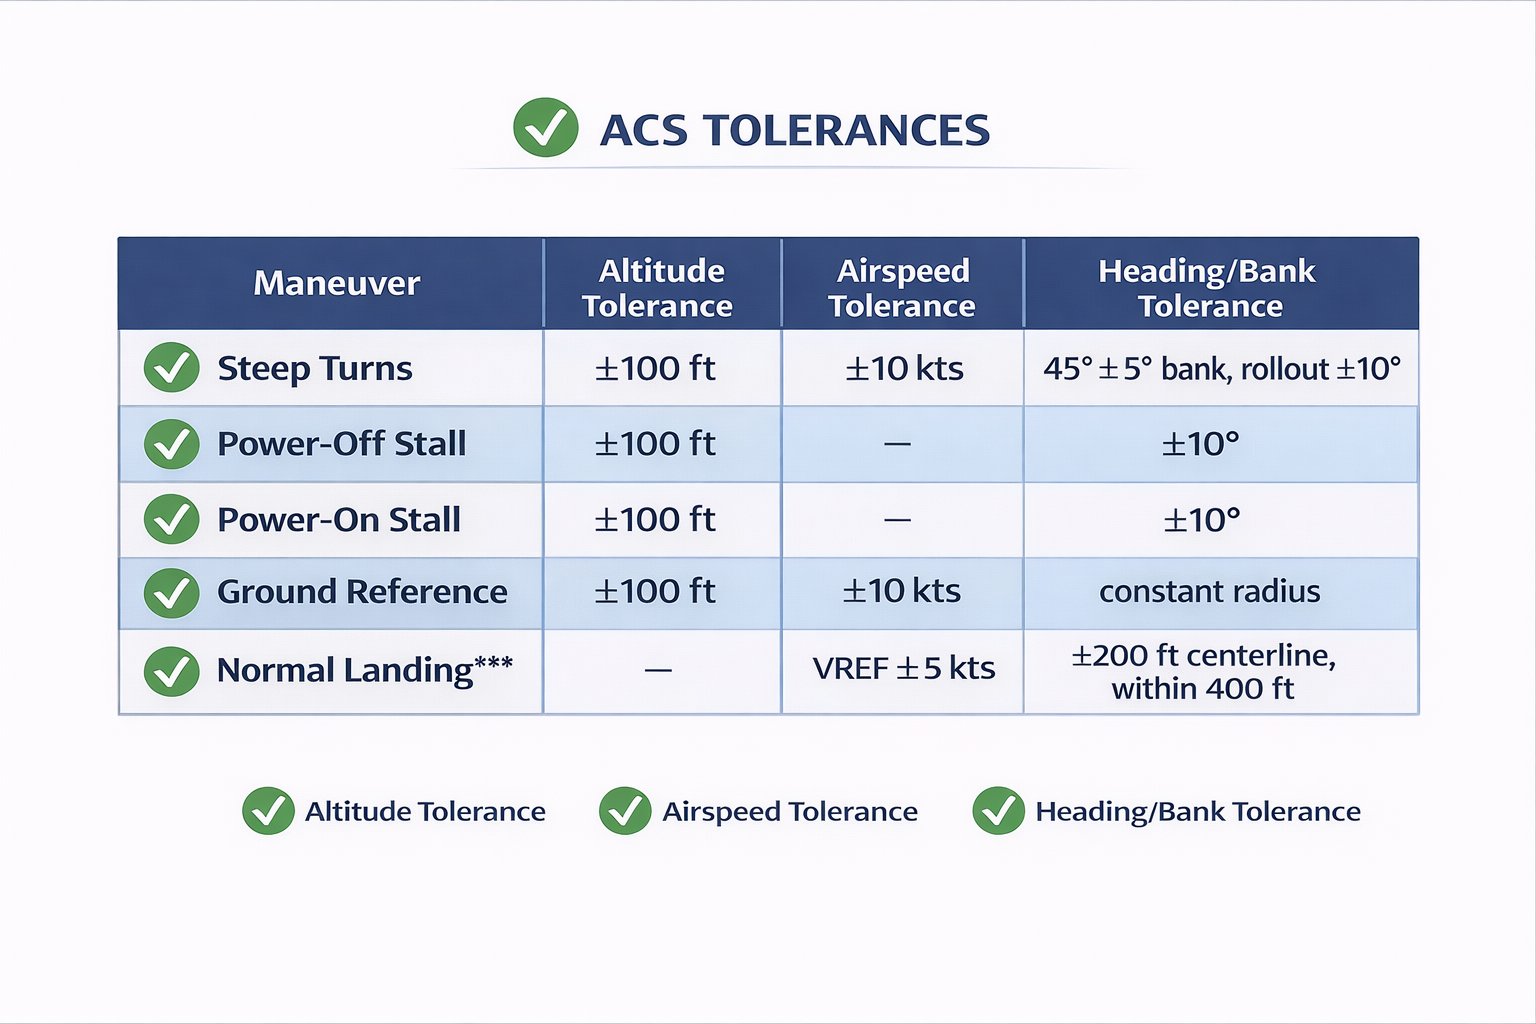
- Stabilized approach at VREF (±5 kts) on final
- Touch down within 400 feet beyond the aiming point
- Touch down on the main gear first in a nose-high attitude
- Maintain directional control throughout rollout
- Unstabilized approach — excessive speed changes on final
- Flaring too high — dropping the last 3 feet
- Flaring too late — firm arrival
- Balloon on flare — adding back pressure too aggressively
Tip: The 400-foot standard is generous — most students aim for the first 200 feet. Focus on airspeed control on final and let the flare develop naturally from a consistent sight picture.
- Apply correct aileron and rudder inputs for crosswind
- Maintain runway centerline during takeoff roll and after liftoff
- Land in a slipping or crabbing technique (your choice)
- Touch down within 400 ft of aiming point, on centerline
- Insufficient upwind aileron during takeoff roll
- Allowing drift after liftoff — "flying sideways"
- Failing to kick out the crab on touchdown (side-load on gear)
- Not using enough rudder to maintain alignment on rollout
Tip: The DPE will ask you to demonstrate the technique you prefer (slip vs. crab). Either is acceptable — just commit to it and explain it if asked.
- Takeoff: Hold brakes, full power, release, rotate at Vr, climb at Vx (±5 kts)
- Landing: Approach at VREF for obstacle clearance configuration
- Touch down within 200 feet beyond the aiming point (stricter than normal)
- Apply braking immediately after touchdown
- Not using full power before brake release
- Climbing at Vy instead of Vx (obstacle clearance speed)
- Floating past the 200 ft mark due to excess airspeed on approach
- Forgetting to apply braking after touchdown
Tip: Know your aircraft's specific Vx and Vr numbers cold. The DPE will ask you to call them out. The 200-foot touchdown standard is half the normal requirement — airspeed discipline on final is everything.
Stall recovery — reduce AOA, then add power
- Takeoff: Continuous rolling start (no stopping), full back elevator initially
- Liftoff as soon as possible, accelerate in ground effect to Vy, then climb
- Landing: Very smooth, gentle touchdown — fly it onto the runway
- Hold nose off as long as possible during rollout
- Stopping on the runway (would bog in soft field — defeats purpose)
- Climbing out of ground effect before reaching Vy (could settle back in)
- Firm touchdown — defeats the purpose of soft field technique
- Dropping nose immediately after touchdown
Tip: Soft field takeoff requires the most coordinated sequence of all the takeoff types. Brief yourself through it before entering the runway. The technique is about keeping weight on wings, not wheels.
- Recognize the need for go-around promptly
- Apply full power immediately
- Establish correct pitch attitude
- Retract flaps in stages per POH (not all at once)
- Track runway centerline and climb to pattern altitude
- Delaying the decision — hesitating too long
- Retracting all flaps at once (loss of lift)
- Not adding enough right rudder to counteract P-factor at full power
- Forgetting to retract carb heat (if applied)
Tip: DPEs may set up an unstabilized approach or throw a simulated obstacle to force a go-around decision. The correct answer is always: if in doubt, go around. Early and decisively.
Flight Maneuvers
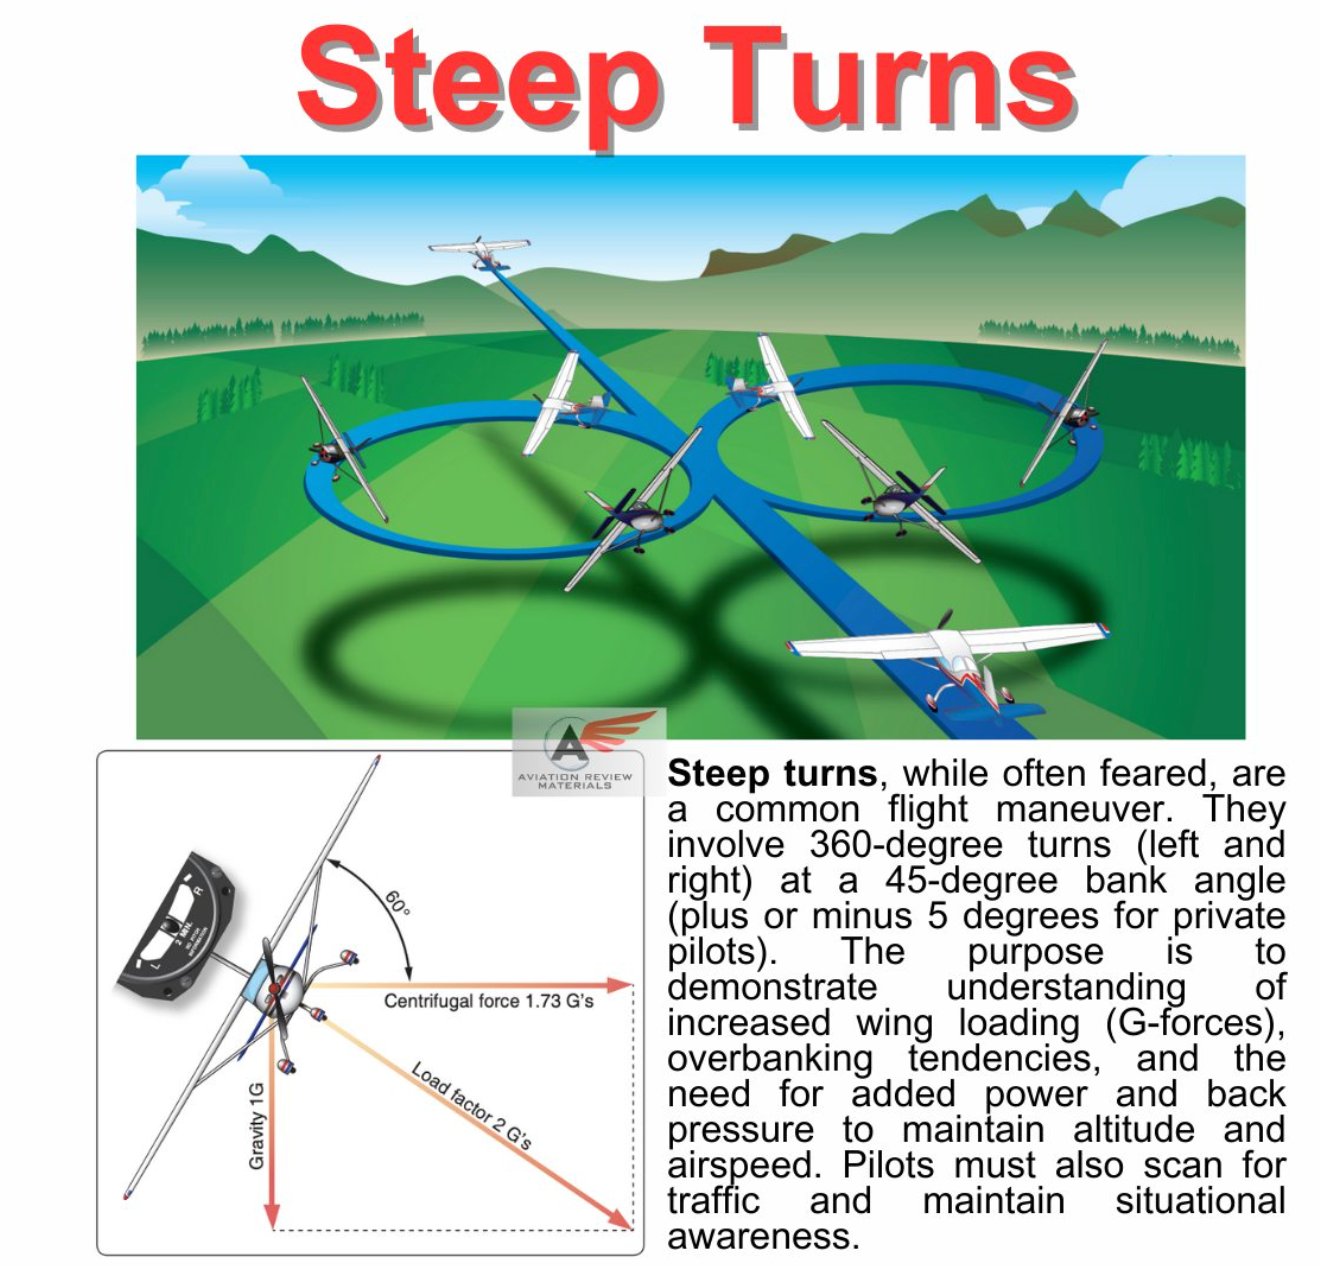
- Entry airspeed: Va or below, as specified by evaluator
- Bank: 45° ±5°
- Altitude: ±100 feet throughout
- Airspeed: ±10 knots throughout
- Rollout: Within ±10° of entry heading
- Complete at least 360° (usually both left and right)
- Losing altitude in the turn — not adding enough back pressure
- Gaining altitude on rollout — releasing back pressure too early
- Over-banking beyond 50° (stall speed increases significantly)
- Rollout heading too early or late
Tip: Add power when entering the turn to maintain airspeed (the increased drag from steep bank requires it). Use a prominent landmark on the horizon for rollout reference. The altitude tolerance is strict — practice until it's automatic.

- Establish and maintain controlled flight at minimum controllable airspeed (just above stall)
- Altitude: ±100 feet
- Heading: ±10°
- Bank: ±10° in turns
- Airspeed: At or above minimum controllable (stall warning may activate)
- Applying back pressure to slow down instead of reducing power
- Not maintaining altitude as the aircraft slows — nose drops
- Using aileron to raise a low wing (rudder is primary at slow speed)
- Insufficient right rudder to counteract torque at high power, low speed
Tip: The ACS now requires slow flight "without the activation of a stall warning." Know what MACS looks like for your specific aircraft — it varies. Practice with and without flaps.
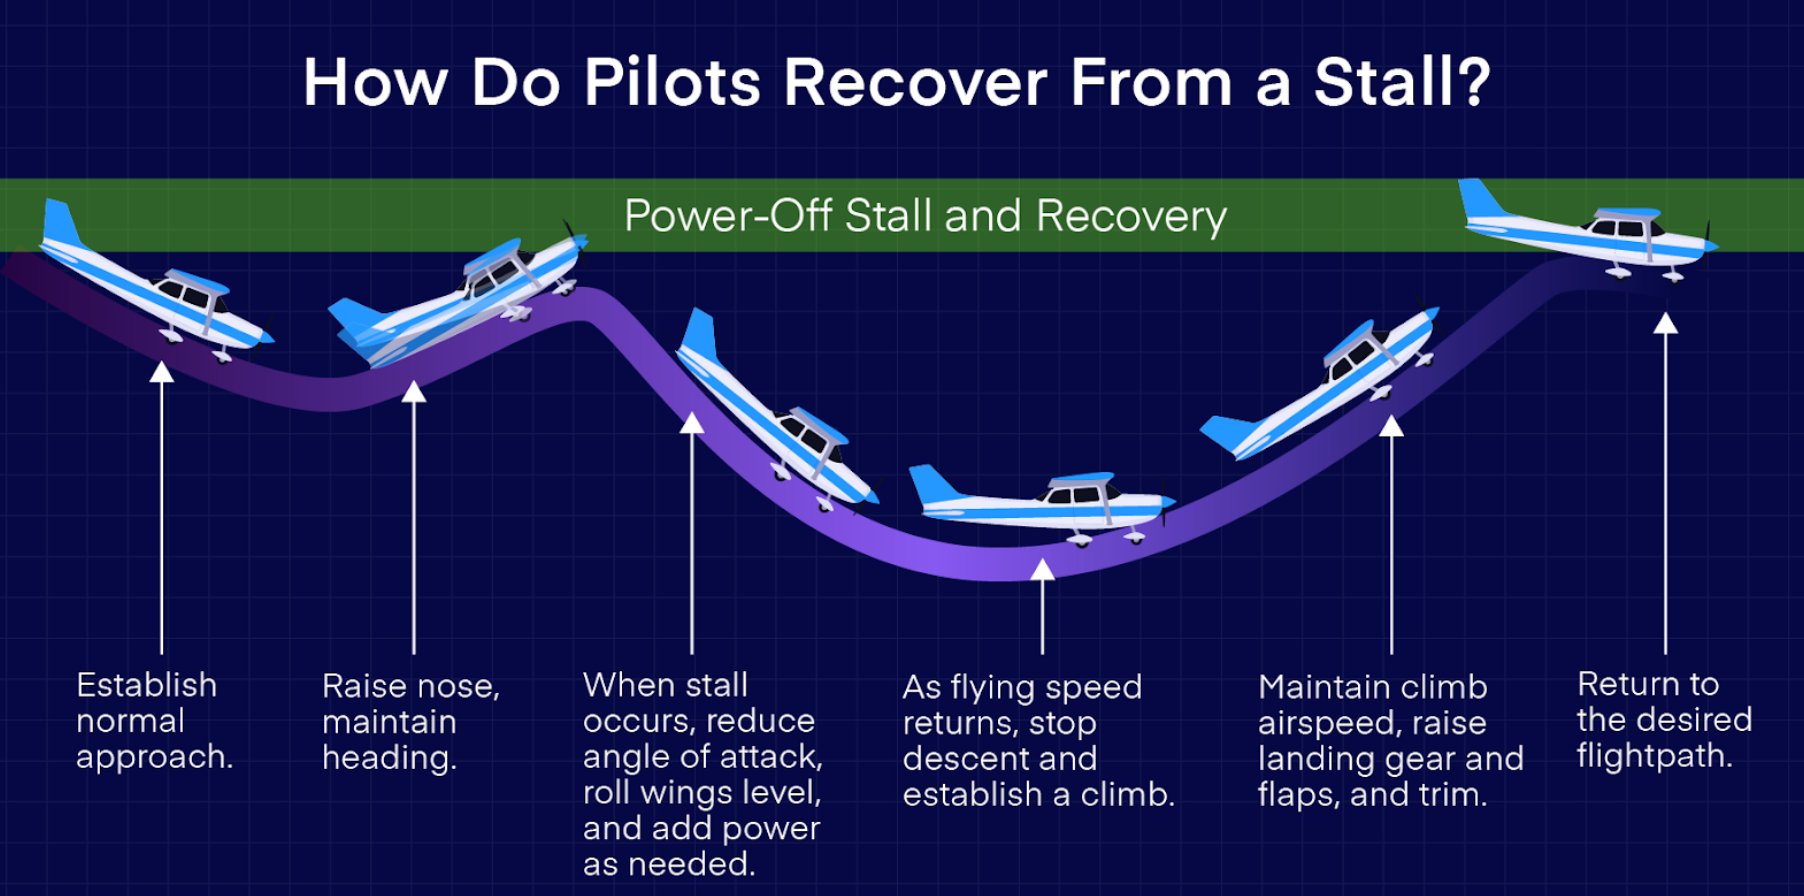
- Simulate approach-to-landing configuration (flaps, reduced power)
- Establish stall — recognize buffet or stall horn
- Recover with minimum altitude loss: pitch to reduce AOA, add full power, level wings with rudder
- Return to Vy climb; retract flaps in stages
- Complete recovery with less than 100 ft altitude loss from stall point
- Adding power before reducing angle of attack (pitch first)
- Using aileron to pick up a dropping wing (use rudder)
- Failing to apply sufficient right rudder — torque causes left roll
- Retracting all flaps at once during recovery (loss of lift)
Tip: The recovery sequence is: pitch forward → full power → rudder to level wings → flaps up in stages. Pitch first. Not power first. This is the most common error and the one DPEs watch for.
ACS tolerances — know these before your checkride
- Simulate departure configuration (takeoff flaps or clean)
- Establish climb attitude at takeoff power, slow to stall
- Recover: Reduce AOA, maintain full power, wings level with rudder
- Return to Vy; retract flaps in stages
- No secondary stall during recovery
- Insufficient right rudder — power-on stalls roll left aggressively
- Recovering at first buffet rather than the actual stall break
- Inducing a secondary stall by recovering too aggressively nose-down
Tip: Power-on stalls require significant right rudder because high power plus high angle of attack creates strong left-turning tendencies. Anticipate it and apply right rudder proactively as you approach the stall.
- Select prominent ground reference point
- Maintain constant radius — adjusting bank angle for wind correction
- Altitude: ±100 feet throughout
- Airspeed: Appropriate for the maneuver (below Va)
- Complete at least 360° in each direction
- Not varying bank to compensate for wind — constant bank produces oval, not circle
- Losing altitude in the steeper bank (downwind portion)
- Watching the ground reference instead of scanning for traffic and attitude
Tip: The steepest bank is directly downwind (fastest groundspeed = tightest turn needed). Shallowest bank is directly upwind. Think of it as a continuously changing bank maneuver driven by groundspeed.
- Select a straight road with no obstructions, perpendicular to wind
- Each half-circle of equal radius on both sides of road
- Cross the road wings level each time
- Altitude: ±100 feet
- Unequal radius half-circles — not compensating for wind
- Not being wings-level when crossing the road
- Starting the maneuver from the wrong position (should start downwind of road)
Tip: Think of S-turns as two linked turns-around-a-point, each on opposite sides of the road. The radius must match each time — wind compensation is the skill being tested.
Emergency Operations
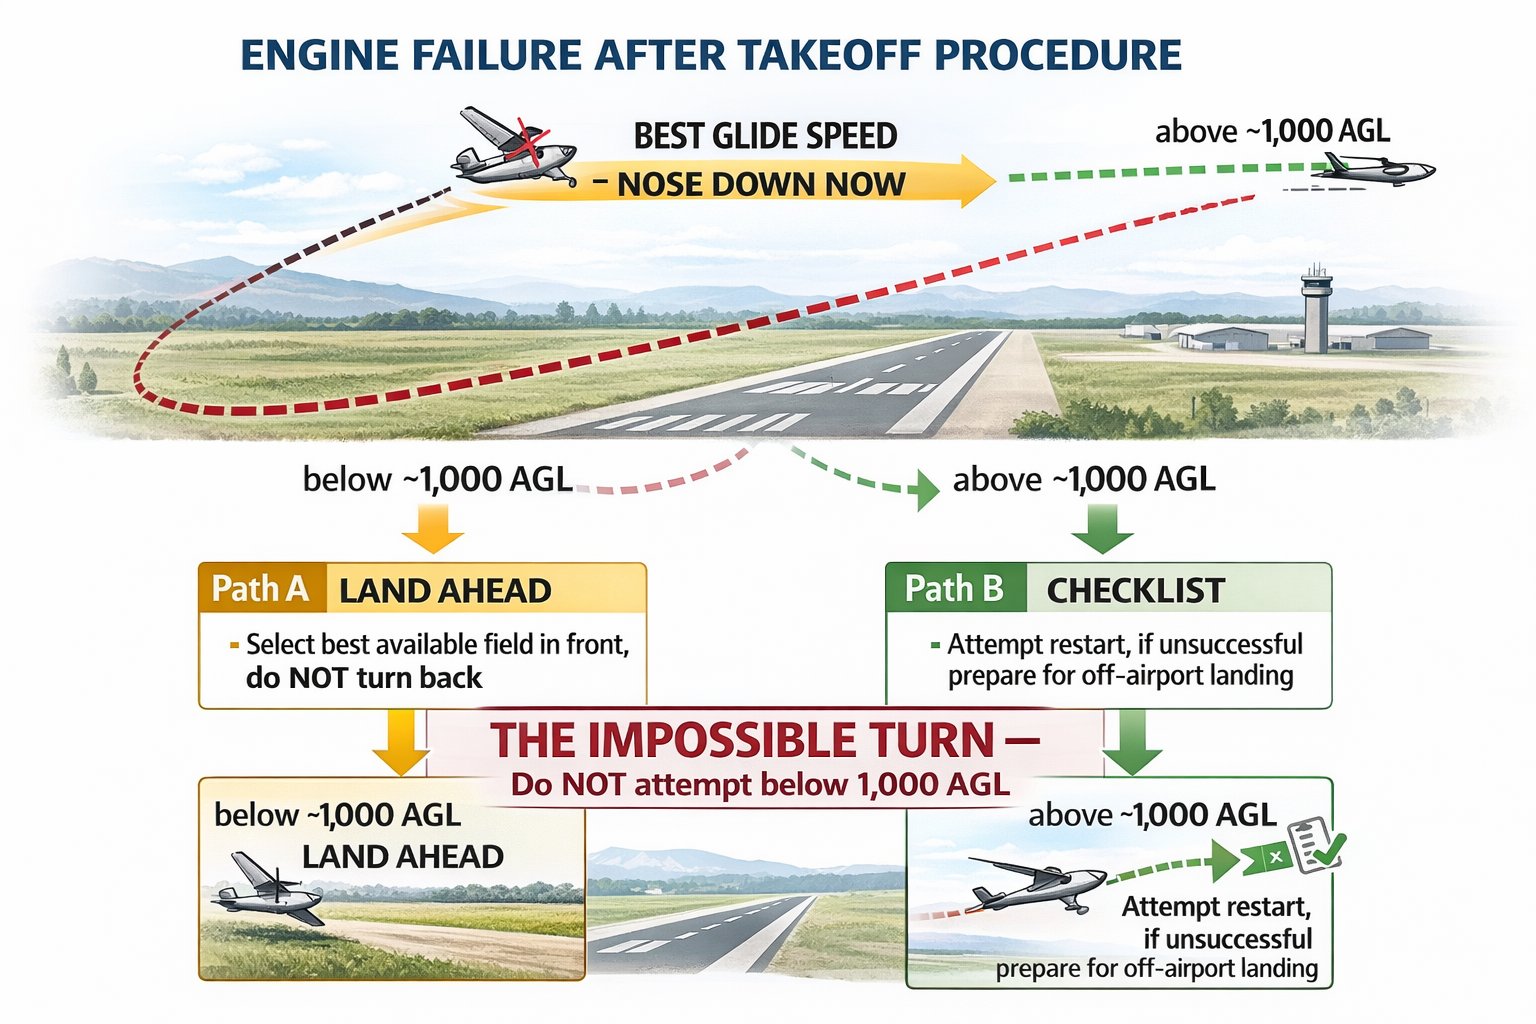
- Establish best glide speed immediately (±5 kts)
- Select a suitable landing area within gliding distance
- Configure aircraft for best chance of successful forced landing
- Follow emergency checklist (fuel, mags, primer, carb heat, etc.)
- Attempt radio call (7700 squawk, MAYDAY on 121.5)
- Complete at a point where a safe landing could be made
- Not establishing best glide immediately — every second counts
- Selecting an unsuitable landing area (too short, obstacles, terrain)
- Forgetting the emergency checklist — some engines will restart
- Spending too much time on radio instead of flying the glide
- Arriving too high — no go-around option in a real forced landing
Tip: Aviate first. Navigate second. Communicate third. The DPE will announce "simulated engine failure" and immediately watch what you do with airspeed — best glide must come first, immediately. Know your best glide speed by heart.
Navigation & Cross-Country
- Plan and execute flight to a destination airport
- Navigate using pilotage, dead reckoning, and/or GPS
- Identify position within 3 nm at any point during the flight
- Arrive within 3 minutes of ETA and within 3 nm of desired track
- Complete diversion to alternate within tolerances if requested
- Relying solely on GPS without pilotage backup
- Poor fuel planning — not accounting for winds
- Failing to request flight following when appropriate
- Not updating ETA as winds change
Tip: The DPE will likely divert you to an alternate mid-route. Practice diverting on your practice flights — identify a random airport and estimate heading, distance, and ETA using your E6B or mental math. The ±3 nm tolerance is strict.
Use our full PPL checkride guide for complete oral exam preparation, what to bring, what the DPE is looking for in each phase, and how to handle a checkride failure. The maneuver standards above are only part of the practical test.