Drone Systems & Components
- How multirotor and fixed-wing drones generate lift and control
- LiPo battery chemistry, care, storage, and failure modes
- Flight controller, GPS, IMU, and failsafe systems
- Pre-flight inspection procedures
- Remote ID systems and compliance
- Common failure modes and what to do when they happen
- Preflight checklists and maintenance records
Lesson 1 — How Drones Generate Lift and Control
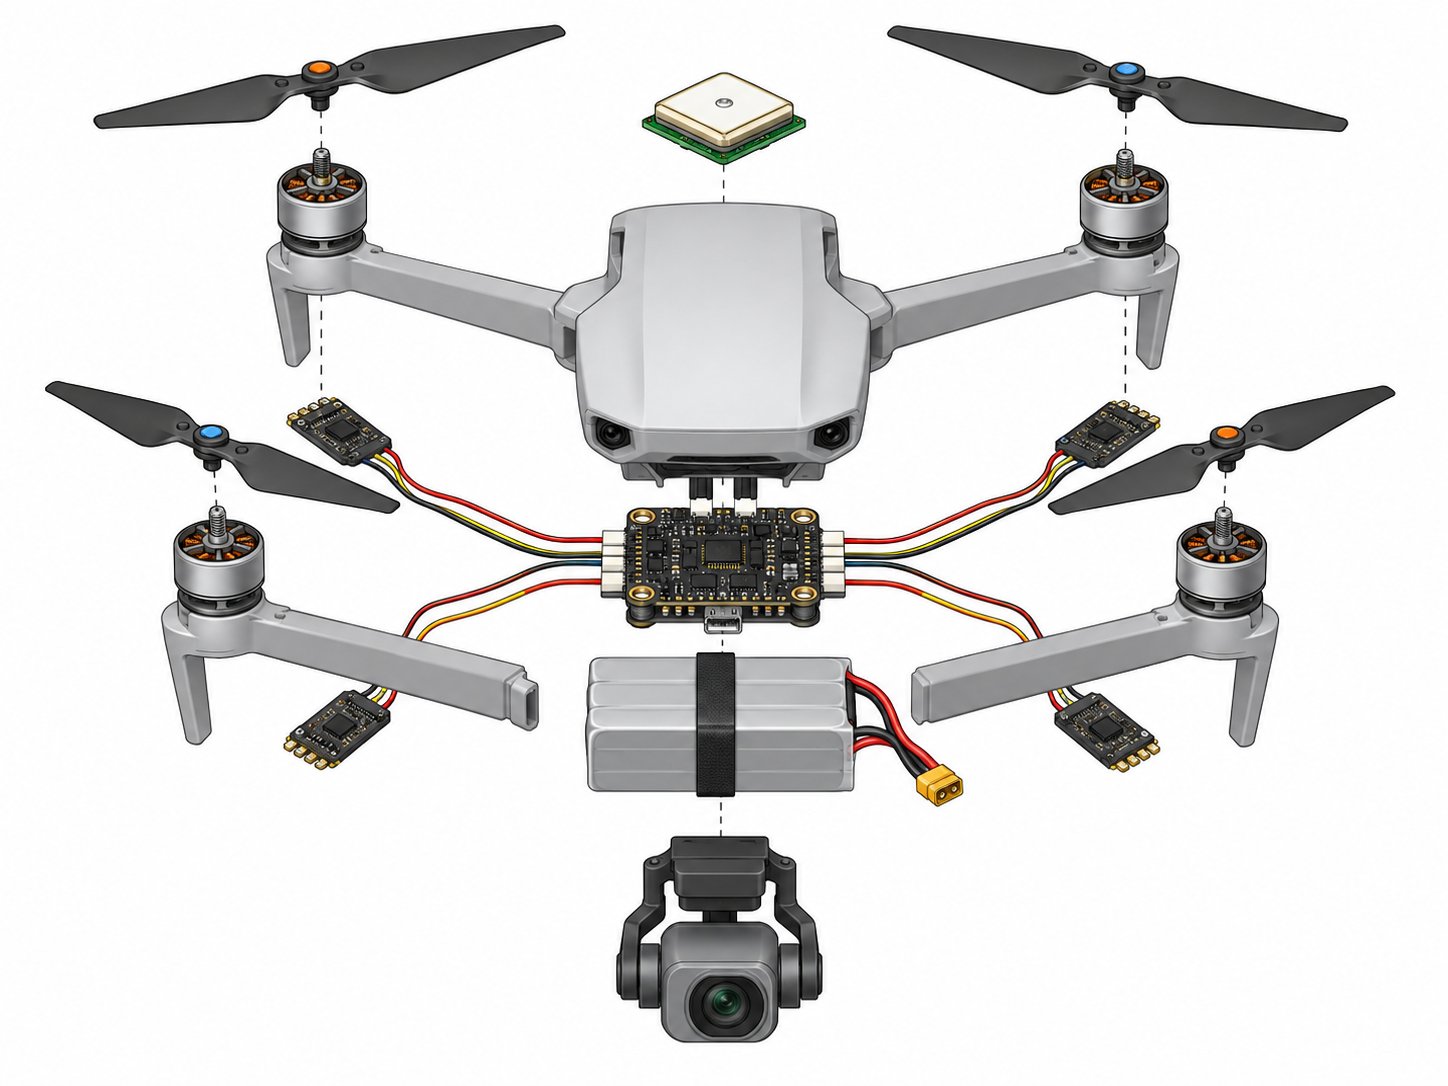
Most commercial drones are multirotors — typically quadcopters (4 motors), hexacopters (6 motors), or octocopters (8 motors). Unlike fixed-wing aircraft that generate lift through forward motion over a wing, multirotors generate lift by spinning propellers at high speed. Each propeller creates a low-pressure zone above it and a high-pressure zone below, pulling the aircraft upward.
Quadcopter exploded view — motors, ESCs, flight controller, battery, GPS module, and gimbal camera
Control is achieved by varying the speed of individual motors. On a quadcopter, diagonal pairs of motors spin in the same direction — two motors spin clockwise, two counterclockwise — which cancels out the torque reaction that would otherwise spin the aircraft. To pitch forward (fly forward), the rear motors increase speed while front motors decrease, tilting the aircraft nose-down. Roll is controlled the same way on the lateral axis. Yaw (rotation) is controlled by speeding up one rotational pair while slowing the other, creating a net torque difference.
Fixed-wing drones — increasingly common in agricultural and mapping applications — fly more like conventional aircraft. They require forward airspeed to generate lift and are significantly more efficient over long distances and large areas. They can't hover but cover far more ground per battery charge than multirotors. Some hybrid VTOL (vertical takeoff and landing) drones combine multirotor and fixed-wing modes, taking off vertically then transitioning to efficient fixed-wing cruise.
Motor and ESC Systems
Brushless motors are the standard in commercial drones due to their efficiency, power density, and longevity compared to brushed motors. A brushless motor has no physical contact between the rotor and stator — instead, the motor controller (ESC, or Electronic Speed Controller) electronically commutates the motor by rapidly switching the current direction in the stator coils. This creates a rotating magnetic field that the permanent magnet rotor follows. The result is a motor that can run at tens of thousands of RPM with minimal wear.
Each motor on a drone has a dedicated ESC that receives commands from the flight controller (typically via PWM or digital protocols like DSHOT) and converts them into the precise three-phase AC power needed to drive the brushless motor. ESC failure — from overheating, electrical surge, or manufacturing defect — is a common cause of drone crashes. Signs of ESC stress include motors that run hot, excessive current draw shown in flight logs, and intermittent motor stuttering during flight. ESCs are rated by maximum continuous current (amps) — always use ESCs rated for at least 20% above the expected maximum motor current.
Propeller Selection and Pitch
Propellers are described by two numbers: diameter and pitch. A 9x4.5 propeller is 9 inches in diameter with a 4.5-inch pitch — theoretically advancing 4.5 inches through the air per revolution in the absence of slip. Larger diameter propellers move more air per revolution and are generally more efficient but require lower RPM. Higher pitch propellers move more air per revolution but require more torque. For commercial drones, manufacturers specify approved propellers — using non-approved props can overstress motors and ESCs, reduce performance, and void warranty.
Propeller balance is critical for smooth operation. An unbalanced propeller creates vibration that affects image quality (jello effect in video), stresses motors and airframe, and can cause resonance that makes the drone difficult to control. Propeller balancers are inexpensive tools that allow you to add small amounts of tape to the lighter blade until the propeller spins without preferential drop. Static balance (propeller balanced at rest) is minimum standard; dynamic balance (propeller balanced while spinning) is superior for demanding applications.
Lesson 2 — LiPo Battery Fundamentals
Virtually all commercial drones use Lithium Polymer (LiPo) batteries. LiPo batteries offer the highest energy density by weight of any commercially available rechargeable battery — critical for a flying device where weight directly impacts performance. However, they require more careful handling than other battery types.
LiPo cells have a nominal voltage of 3.7V per cell. A fully charged cell is 4.2V; a fully discharged cell should not go below 3.5V (3.0V is absolute minimum — going lower causes permanent damage). Drone batteries are rated in capacity (mAh — milliamp hours) and discharge rate (C rating). A 5000mAh 25C battery can deliver 125 amps continuously — important for powerful motors under load.
Storage voltage matters: LiPo batteries stored at full charge or deeply discharged degrade faster. The ideal storage charge is approximately 3.8V per cell — about 50-60% charge. Most modern smart batteries (DJI and similar) have automatic storage discharge modes. For manual LiPo packs, discharge to storage voltage before storing for more than a few days.
Cell Configuration and Voltage
LiPo battery packs are built by connecting individual cells in series (increasing voltage) and parallel (increasing capacity). The "S" designation indicates series cells: a 4S battery has four cells in series at 3.7V each = 14.8V nominal, 16.8V fully charged. The "P" designation indicates parallel groups: a 4S2P battery has two parallel groups of four series cells, doubling the capacity of a 4S1P. Most professional commercial drones use 4S to 6S batteries (14.8V to 22.2V nominal).
Higher voltage systems run motors more efficiently — the same power (watts = volts × amps) can be delivered at higher voltage and lower current, reducing heat in wiring and ESCs. This is why professional heavy-lift drones use 6S or even 12S systems rather than the 3S or 4S systems found in consumer drones. The tradeoff is higher cost, weight, and the need for higher-rated components throughout the power system.
Charging Best Practices
Always use a charger specifically designed for LiPo batteries with a balance charging function. Balance charging monitors each individual cell and ensures they all reach the same voltage — preventing individual cells from over or undercharging relative to their neighbors. A battery with unbalanced cells will have reduced capacity, shortened life, and increased risk of failure. Balance charging takes longer than fast charging but significantly extends battery life.
Never charge LiPo batteries above their rated C-rate. Charging a 5000mAh battery at 5A is a 1C charge rate — relatively gentle and preferred for longevity. Charging at 2C (10A for a 5000mAh pack) is faster but generates more heat and causes faster degradation. For commercial operations where rapid battery turnaround is needed, use multiple batteries and charge at 1C rather than degrading batteries with aggressive fast charging.
Lesson 3 — Battery Failure Modes and Safety
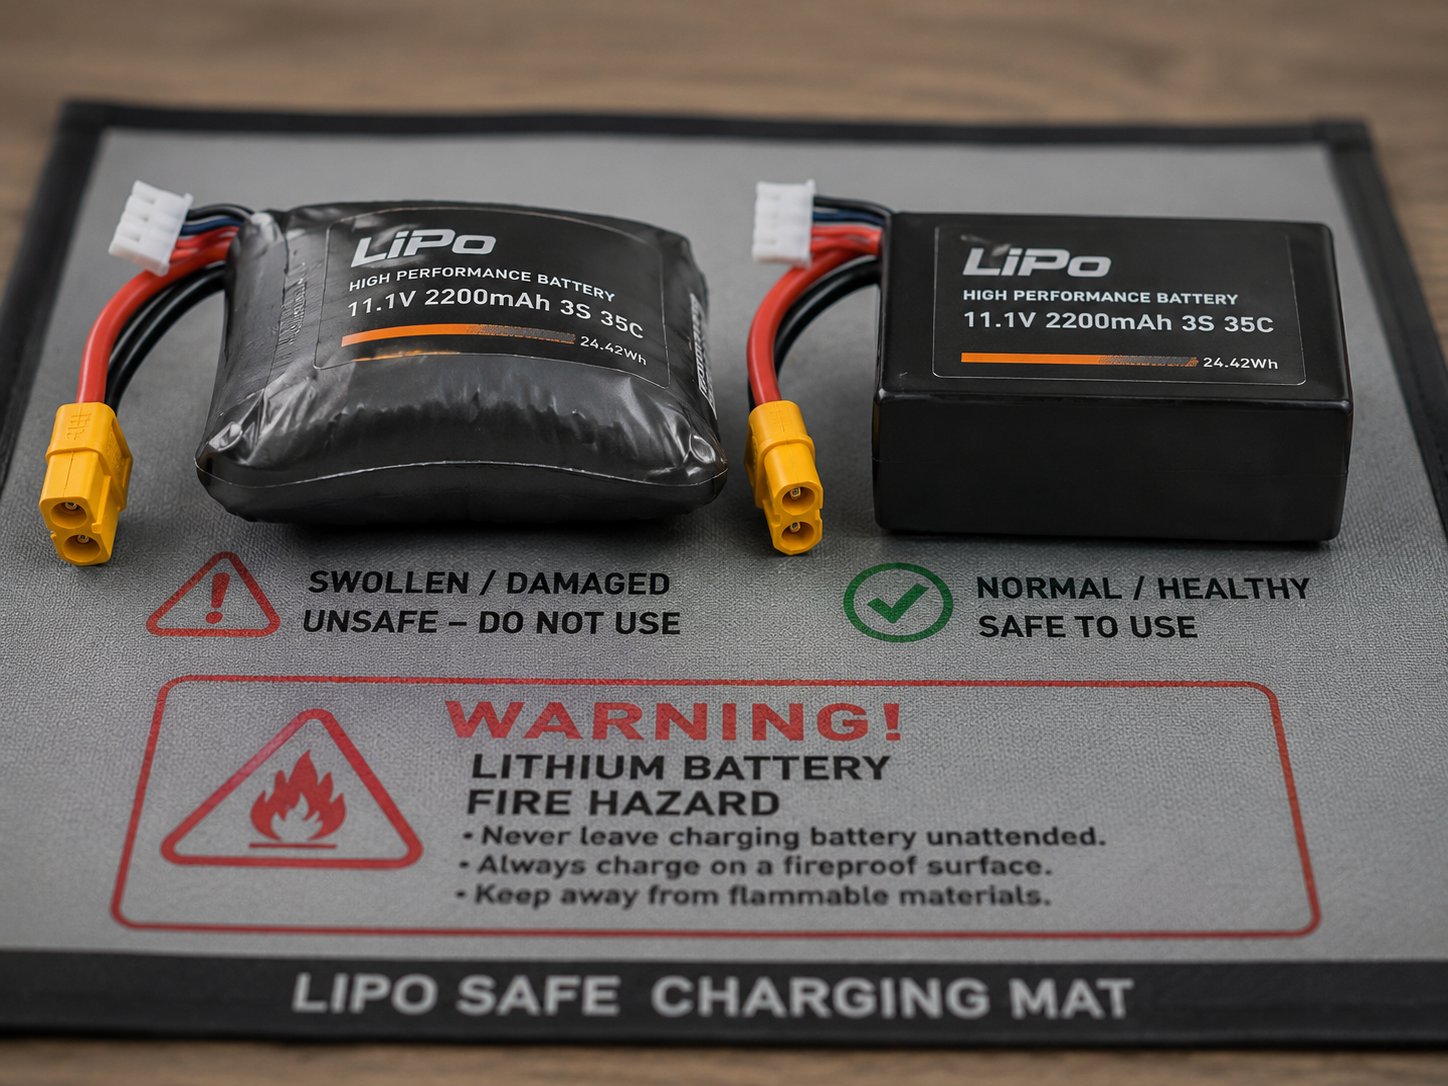
LiPo batteries can fail catastrophically if abused. Thermal runaway — a self-reinforcing heat-generating reaction — can cause a LiPo to rapidly heat, swell, vent toxic gas, and catch fire. Causes include overcharging, deep discharge below minimum voltage, physical damage (puncture, crush), charging at excessively high current, or charging a damaged battery.
Swollen LiPo battery (left) vs healthy battery (right) — never fly a swollen pack
Signs of a damaged battery include: visible swelling (puffy appearance), deformation of the case, unusual heat during charging or use, reduced flight time compared to normal, or visible damage to cells. Never fly a swollen or damaged battery. Discard it properly — LiPo batteries should not go in household trash. Many electronics retailers (Best Buy, Home Depot) accept LiPo batteries for recycling.
Always charge LiPo batteries on a non-flammable surface, never unattended, and never in a vehicle or enclosed space without ventilation. LiPo charging bags — heat and puncture resistant pouches designed to contain a battery fire — are a worthwhile investment for anyone managing multiple batteries.
Never charge a LiPo battery that has been physically damaged, deeply discharged below 3.0V per cell, or that is visibly swollen. Thermal runaway from a damaged LiPo is an extremely rapid, hot fire that is difficult to extinguish with conventional means. When in doubt, dispose of the battery safely.
Reading Battery Health Data
Modern smart batteries (DJI Intelligent Flight Batteries and similar) communicate health data to the drone and app. Monitor internal resistance per cell — increasing resistance indicates aging or damage. Most battery management apps display battery health percentage, cycle count, and error history. A battery showing individual cell voltage imbalance of more than 0.1V after a full balance charge is reaching the end of its service life.
Keep batteries in a cool, dry location — ideally 59-77°F (15-25°C). Heat accelerates LiPo degradation more than almost any other factor. Never leave batteries in a vehicle in direct sun or in any enclosed space that can reach high temperatures. A LiPo battery stored at 120°F (common in a summer vehicle) for extended periods will have measurably reduced capacity within days.
Disposal and Transportation
LiPo batteries require special handling for both disposal and air travel. Never puncture, incinerate, or throw LiPo batteries in household waste — they contain toxic materials and can ignite. Use a LiPo discharger to fully discharge below 3.0V per cell (rendering it safe) before disposal, then take to an electronics recycling facility. Call2Recycle and many Best Buy and Home Depot locations accept LiPo batteries for proper recycling.
Air travel with LiPo batteries has specific TSA and IATA rules. Batteries over 100Wh (watt-hours = voltage × amp-hours) require airline approval; batteries over 160Wh are generally prohibited in carry-on baggage. Calculate your battery's watt-hours: a 4S 5000mAh battery is 14.8V × 5.0Ah = 74Wh (under 100Wh, no special approval). Most consumer and prosumer drone batteries fall under 100Wh. Always carry batteries in carry-on luggage — checked baggage hold conditions can trigger thermal events without detection.
Lesson 4 — Flight Controller, GPS, and IMU
The flight controller (FC) is the drone's brain — a small computer that reads sensor inputs thousands of times per second and adjusts motor speeds to maintain stability and execute pilot commands. Modern flight controllers run sophisticated algorithms (PID controllers) that automatically compensate for wind, weight shifts, and motor variations. Without the flight controller constantly making micro-adjustments, a multirotor would be unflyable by a human pilot.
The Inertial Measurement Unit (IMU) contains accelerometers and gyroscopes that detect the drone's movement and orientation in three dimensions. It provides the flight controller with real-time data about pitch, roll, yaw, and acceleration. IMU calibration is required periodically and whenever the IMU may have been subjected to mechanical shock. An improperly calibrated IMU causes erratic flight behavior — if your drone drifts or behaves unexpectedly after a hard landing, IMU calibration is one of the first things to check.
The GPS module provides position data for position-hold, return-to-home, and autonomous waypoint flight. GPS requires a clear view of the sky — deep urban canyons, indoor operations, and dense tree canopy can degrade GPS signal quality, reducing position accuracy. Most drones combine GPS with GLONASS (Russian navigation satellite system) and sometimes Galileo (European) to increase satellite count and improve accuracy.
Compass Calibration and Interference
The compass (magnetometer) provides heading reference to the flight controller. Compass calibration is required when the drone is moved to a significantly different geographic location (new latitude/longitude changes the local magnetic field), after any firmware update, and whenever the drone shows compass error warnings. The calibration process — typically rotating the drone through a specific series of orientations — maps the local magnetic environment and corrects for hard and soft iron interference from the drone's own components.
Compass interference causes some of the most dangerous drone behavior: the drone believes it's pointed in a different direction than it actually is, causing it to fly in the wrong direction when commanded or to circle uncontrollably when trying to hold position. Never calibrate the compass near metal structures, rebar, vehicles, or other magnetic sources — do it away from interference on open ground. If you're experiencing "toilet bowl effect" (drone circling uncontrollably), suspect compass issues.
Obstacle Avoidance Systems
Professional commercial drones increasingly include obstacle avoidance sensors — typically stereo vision cameras, infrared time-of-flight sensors, or ultrasonic sensors that detect objects in the flight path and either stop the drone or navigate around obstacles. These systems reduce the risk of collisions with trees, power lines, and structures but do not replace pilot attention. Obstacle avoidance systems have important limitations: they typically don't work well in low light, may not detect thin obstacles like wires, and have limited range (typically 10-30 meters depending on the sensor).
In professional operations, treat obstacle avoidance as a backup layer — not a primary collision avoidance strategy. Fly with awareness of the environment, maintain safe clearances, and plan flight paths that don't require the obstacle avoidance system to save the aircraft from poor planning. Obstacle avoidance systems also add weight, consume power, and create drag, reducing overall efficiency.
Lesson 5 — Failsafe Systems
Modern drones have multiple failsafe behaviors programmed to activate when something goes wrong. Understanding what your drone will do in failure scenarios is critical for safe operation and Part 107 compliance.
Return to Home (RTH): Activates when signal is lost, battery is critically low, or manually triggered. The drone climbs to a preset RTH altitude, flies back to the home point (where it was armed), and descends to land. Set RTH altitude higher than any obstacle between your drone and launch point — RTH altitude is one of the most important settings to configure before every flight in new environments.
Low battery warning: First warning at a configurable battery percentage (typically 20-25%), giving the pilot time to return. Critical battery landing (typically 10-15%) triggers automatic descent regardless of pilot input. Know your drone's battery behavior — in cold weather, battery capacity can drop suddenly and without proportional warning.
Signal loss behavior: Configurable — hover in place, return to home, or land immediately. The appropriate choice depends on your operating environment. In areas with obstacles, RTH may be safer than hovering. Over water or in congested areas, immediate landing may cause more damage than hovering.
Geofencing and Unlocking
Most commercial drones include manufacturer-imposed geofencing that prevents flight in restricted areas based on a built-in database of sensitive locations — airports, national parks, stadiums, and other sensitive sites. DJI's GEO system is the most well-known example. These manufacturer restrictions are separate from FAA regulations — the manufacturer may restrict an area that the FAA permits (with proper authorization), requiring the pilot to "unlock" the restriction through the manufacturer's authorization process.
To unlock manufacturer geofencing for authorized operations: obtain your LAANC authorization or FAA waiver first, then use the manufacturer's unlocking process (DJI's self-unlock process or authorized-user unlock). The drone's flight app will require confirmation and may log the unlock event. Attempting to physically or electronically circumvent geofencing without going through the proper process violates both the manufacturer's terms of service and potentially federal computer fraud laws.
Home Point and RTH Configuration
The "home point" is the GPS coordinate where the drone will return during RTH. Most drones update the home point automatically when the GPS lock is established after power-on. In dynamic operations where the pilot moves during flight, some aircraft can continuously update the home point to the pilot's current location (using a GPS-equipped controller) — useful for follow-me operations but requires careful configuration.
Check the home point before every flight — confirm it has locked on the correct location and that the RTH altitude is set appropriately. In an urban environment, set RTH altitude above the tallest nearby structure plus a safety margin. Verify the RTH landing zone is clear of obstacles — a smooth lawn is preferable to a parking lot or near traffic. Some pilots place a visual marker (orange cone or mat) at the home point to confirm the drone returns to the correct spot during testing.
Lesson 6 — Pre-Flight Inspection
A thorough pre-flight inspection is a Part 107 requirement (14 CFR 107.49) and a practical safety necessity. Developing a consistent checklist-based approach — and actually following it every time — is what separates professional operators from those who eventually have an incident. Pre-flight inspection should cover:
The "FIRST" Drone Preflight Checklist
Many professional operators use the FIRST mnemonic for drone preflight: Framework (airframe integrity), Instruments (sensors and electronics), Run-up (motor and propeller test), Security (all connections secure), Takeoff area (environment clear). This structure ensures consistent coverage regardless of time pressure or distraction.
The motor run-up test deserves special attention — briefly spin all motors at low power and listen for any unusual sounds (grinding, clicking, or uneven sound between motors) and watch for unusual vibration. A motor with a bad bearing or debris in the housing will make its presence known during a low-power run-up, giving you the opportunity to abort before the motor fails at altitude. This 30-second test prevents many crashes.
Site Survey and Hazard Assessment
Before flight, survey the operating area for hazards not visible on maps or satellite imagery: power lines (often unmapped in detailed GIS data), communication towers, wildlife (birds of prey are attracted to drones and will strike them), temporary structures like cranes and scaffolding, and bystanders who have moved into the operating area since your pre-mission planning. Walk the perimeter of your operating area if possible, or use binoculars to scan for hazards at distance.
Identify emergency landing zones before flight. Know where you can set the drone down safely if a battery emergency, motor failure, or lost link occurs at various points in your mission profile. In urban environments, this requires specific planning — rooftops, parks, and parking lots may all be viable depending on the situation. Having pre-identified emergency landing options reduces decision time during an actual emergency, when stress impairs judgment and time is limited.
- Airframe: Check for cracks, deformation, loose screws, or damage to arms and body from previous flights.
- Propellers: Inspect each propeller for chips, cracks, or deformation. A damaged prop causes vibration, reduces efficiency, and can fail in flight. Replace any prop with visible damage.
- Motors: Spin each motor by hand (with battery disconnected) — it should spin freely and smoothly. Bearing noise, grinding, or resistance indicates a problem.
- Battery: Check charge level, inspect for swelling or damage, confirm secure seating in battery bay.
- Gimbal and camera: Confirm gimbal is undamaged, camera lens is clean, SD card is present and formatted.
- Controller: Confirm charge level, antenna orientation, tablet/phone mount secure.
- Software: Check for firmware warnings or required updates. Confirm app is current. Review airspace authorization if operating in controlled airspace.
Lesson 7 — Remote ID and Maintenance Records
Remote ID — discussed in Module 1 — is a hardware/software system that broadcasts identification and location data. For drones without built-in Remote ID manufactured before the compliance date, a broadcast module (small external device) can be added. The module must be securely attached, powered on before flight, and functional throughout the flight. Verify Remote ID functionality as part of your pre-flight checks.
Maintenance records are not legally required for Part 107 operations, but maintaining them is professional best practice. Records should include: flight date and location, flight duration, battery cycles used, any anomalies or incidents, maintenance performed, and equipment changes. This documentation is invaluable for insurance claims, client contracts, FAA investigations, and identifying developing maintenance issues before they cause failures.
For professional operations, consider a simple spreadsheet or dedicated drone logbook app. Record every flight. Note anything unusual — even if it doesn't affect the mission. Patterns of anomalies (intermittent GPS loss, unexpected compass errors) often precede failures and catching them early saves expensive equipment and client relationships.
Remote ID Technical Details
Remote ID operates on 2.4GHz and 5.8GHz WiFi broadcast bands (broadcast module) or through internet connection (network Remote ID, currently not required but supported by some systems). The broadcast signal can be detected by smartphones, tablets, and dedicated Remote ID receivers within approximately 1 kilometer under good conditions. Law enforcement can use Remote ID to identify drone operators — the signal broadcasts the operator's takeoff location, which is typically where the operator is standing.
Some professional operations — particularly those in areas with security sensitivity — have explored Remote ID privacy implications. The FAA permits operations at FAA-Recognized Identification Areas (FRIAs) without Remote ID broadcast. FRIAs are designated locations (typically model flying club fields) where traditional model aviation has occurred. However, FRIAs are not suitable for most commercial operations — they're specific fixed locations, not wherever a commercial operator needs to work.
Aircraft Maintenance and Repair Records
For commercial drones, tracking maintenance history provides multiple benefits. Insurance adjusters reviewing a claim after an incident will assess whether the aircraft was properly maintained. Client contracts increasingly specify maintenance standards. And practically, tracking maintenance intervals — motor replacements, prop replacements, gimbal servicing, firmware updates — prevents the oversight that leads to in-flight failures from worn components.
Establish replacement intervals based on manufacturer recommendations and operational experience. Propellers should be inspected after every flight and replaced at the first sign of damage. Motors in commercial service may need bearing replacement every 200-300 hours. Gimbal ribbon cables fail with cycling — inspect them every 50-100 hours. Create a simple maintenance log that records component age, replacement history, and scheduled future maintenance. This transforms reactive maintenance (fix it when it breaks) into proactive maintenance (replace it before it breaks at altitude).