Aircraft Systems — Understanding Everything Under the Cowl and Behind the Panel
A pilot who understands how aircraft systems work can identify anomalies early, manage partial failures correctly, and perform emergency procedures without confusion. This module covers the powerplant, fuel, electrical, pitot-static, vacuum, and landing gear systems — with emphasis on what can go wrong and how you handle it.
- Describe the four-stroke engine cycle and explain what happens in each stroke
- Explain the dual magneto system and interpret magneto check results
- Identify conditions that cause carburetor ice and describe recognition and corrective action
- Describe the fuel system including tank venting, sump drains, and fuel grades
- Explain the pitot-static system and the effect of blockages on each instrument
- Describe what happens when the alternator fails and how to manage battery power
- Explain what the vacuum system powers and what fails when vacuum is lost
Lesson 1 — The Reciprocating Engine
Most training aircraft are powered by horizontally opposed, air-cooled reciprocating engines — typically four or six cylinders arranged in opposing pairs. The engine produces power through a repeating four-stroke cycle: intake, compression, power, and exhaust. Only the power stroke produces useful work; the other three are mechanical setup strokes driven by the crankshaft's momentum and flywheel effect.
During the intake stroke, the piston moves down and draws a fuel-air mixture through the open intake valve. On the compression stroke, both valves close and the piston moves up, compressing the mixture to roughly 8:1. At top dead center, both spark plugs fire simultaneously (from separate magnetos), igniting the mixture. The burning gases expand rapidly on the power stroke, forcing the piston down and turning the crankshaft. Finally, the exhaust valve opens and the piston sweeps burned gases out on the exhaust stroke.
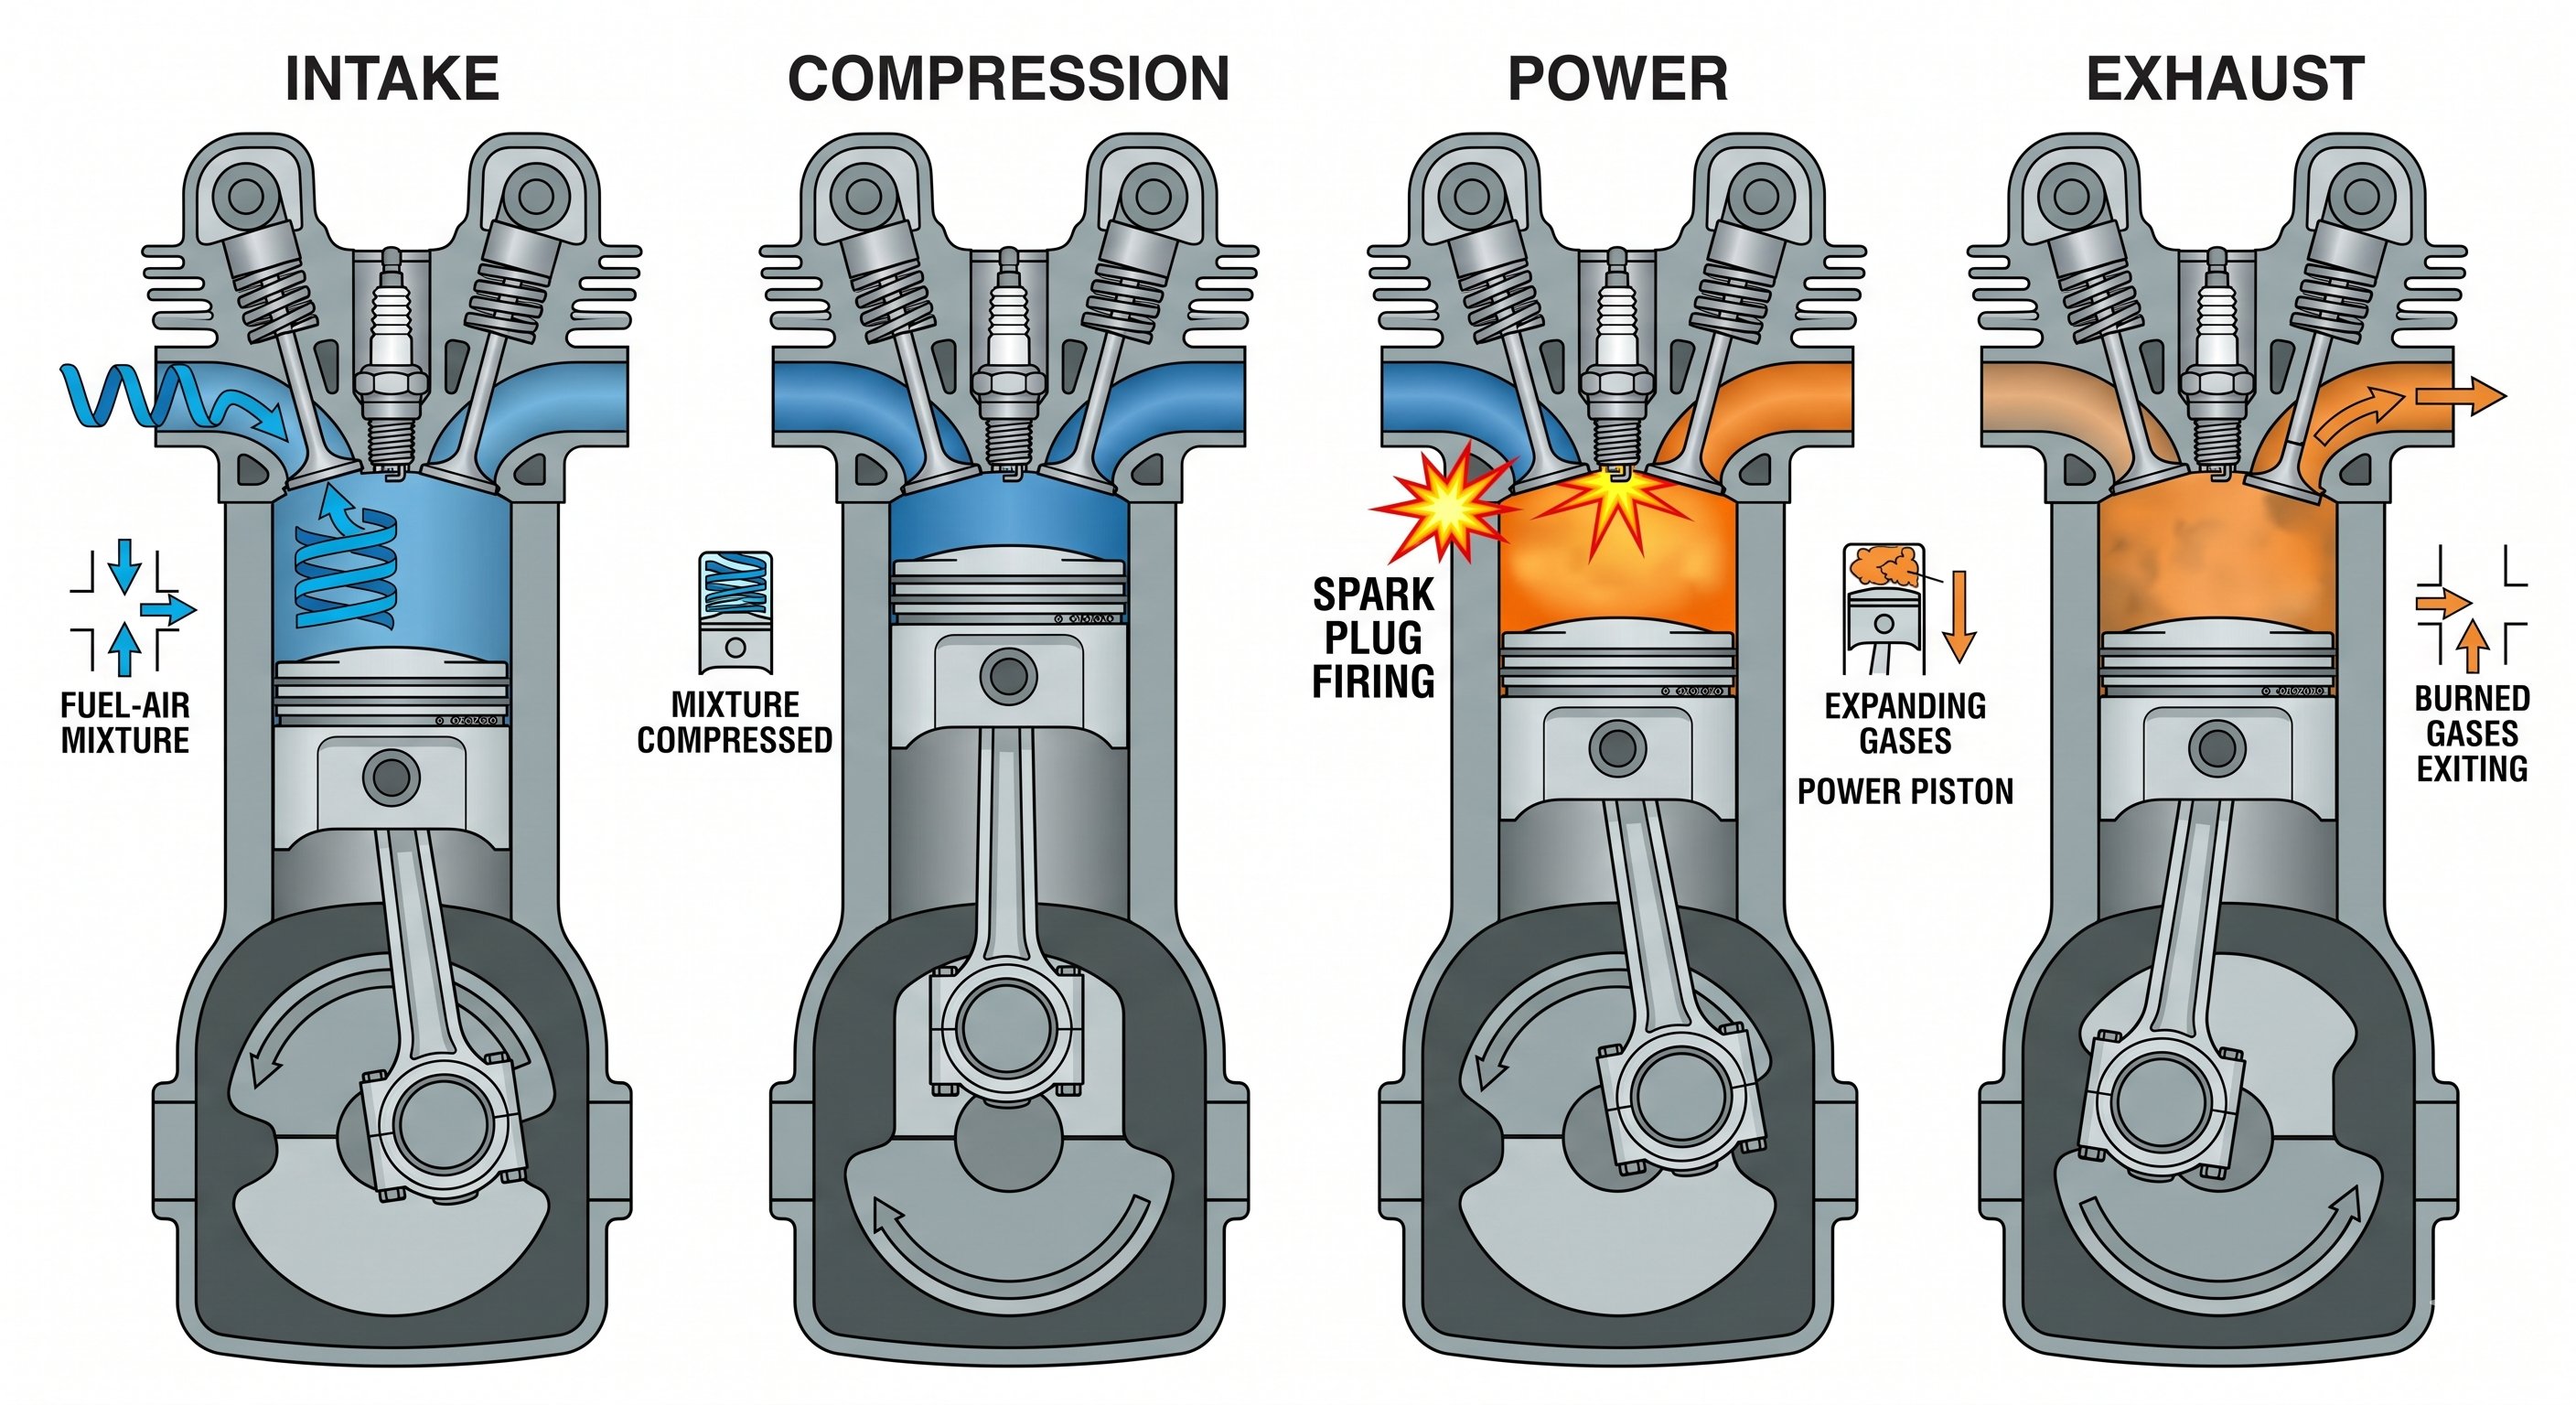
The four-stroke engine cycle — only the power stroke produces useful thrust
The mixture control manages the fuel-to-air ratio entering the engine. At sea level use full rich, but as altitude increases air density drops — the mixture becomes too rich, causing rough running and high fuel burn. Lean at cruise altitude until peak RPM (fixed-pitch) or peak EGT (constant-speed), then enrich slightly. Always return to full rich before descending or adding power.
If the engine loses power, pitch immediately for best glide speed to maximize glide distance. Then run the restart checklist: fuel selector to BOTH, mixture rich, carb heat on, primer locked, magnetos checked on BOTH. Most light aircraft engine failures trace back to fuel mismanagement — running a tank dry, wrong selector position, or improper leaning.
Engine Temperatures and Cooling
Air-cooled aircraft engines rely entirely on airflow over the cylinder fins for cooling — there's no liquid coolant loop. Cylinder head temperature (CHT) and exhaust gas temperature (EGT) are the primary indicators of engine health. CHT is measured at the cylinder head and reflects overall thermal load. EGT measures combustion temperature and is primarily used as a leaning reference. Both are affected by power setting, mixture, airspeed (and therefore cooling airflow), and outside air temperature.
Shock cooling — reducing power rapidly and descending at high airspeed — can stress engine cylinders by cooling them unevenly. The recommended technique is to reduce power gradually and maintain cruise RPM as long as practical during descent. On the other side, operating at high power in a prolonged climb in hot weather without sufficient airspeed can overheat the engine. If CHT climbs into the yellow or red arc, reduce power, enrich the mixture, and increase airspeed to improve cooling airflow.
Oil System
The engine oil system provides lubrication, cooling, and corrosion protection. Oil pressure and oil temperature are two of the most critical engine gauges — check them immediately after start and monitor throughout flight. Oil pressure should be in the green arc within 30 seconds of a warm start, 60 seconds in cold weather. If oil pressure fails to rise, shut down immediately — you can destroy an engine in seconds by running it without oil pressure.
Oil temperature rises more slowly and is a long-term indicator of engine health. High oil temperature combined with low oil pressure typically indicates oil starvation — a serious emergency. Low temperature throughout a flight in cold weather may indicate the oil cooler bypass isn't functioning correctly. Check oil level during preflight — most piston aircraft consume a small amount of oil during normal operation. Know the minimum oil level for your aircraft before flight.
Detonation and Pre-ignition
Detonation occurs when the fuel-air mixture in the cylinder explodes rather than burning progressively from the spark plug outward. Instead of a controlled, expanding flame front, the mixture detonates simultaneously throughout the cylinder, creating a pressure spike that far exceeds design limits. Detonation can destroy pistons, rings, and cylinder heads quickly. It's caused by high cylinder temperatures combined with low-octane fuel, excessively lean mixture, or high manifold pressure with low RPM.
Pre-ignition is ignition of the fuel-air mixture before the spark plugs fire, caused by a hot spot in the cylinder — a glowing carbon deposit, an overheated exhaust valve, or a damaged plug. Pre-ignition is extremely destructive and can destroy an engine in seconds. Both detonation and pre-ignition are prevented by using the correct fuel grade, proper mixture management, not overloading the engine, and maintaining adequate cooling airflow.
Lesson 2 — The Magneto System
Aircraft engines use a dual magneto ignition system that is completely independent of the aircraft's electrical system. Each magneto generates its own high-voltage current to fire one of two spark plugs per cylinder. This redundancy is critical — if the battery or alternator fails completely, the engine continues running because the magnetos are self-powered by the engine's rotation.
The magneto check during the run-up tests each magneto independently. Switching from BOTH to LEFT or RIGHT should cause a small RPM drop — typically 75–125 RPM per your POH. A larger drop indicates a problem with that magneto or its plugs. No drop at all is actually a warning sign — it may mean the magneto is not grounding when switched off (a "hot mag"), which is a safety hazard since the engine could fire when the propeller is hand-turned on the ground.
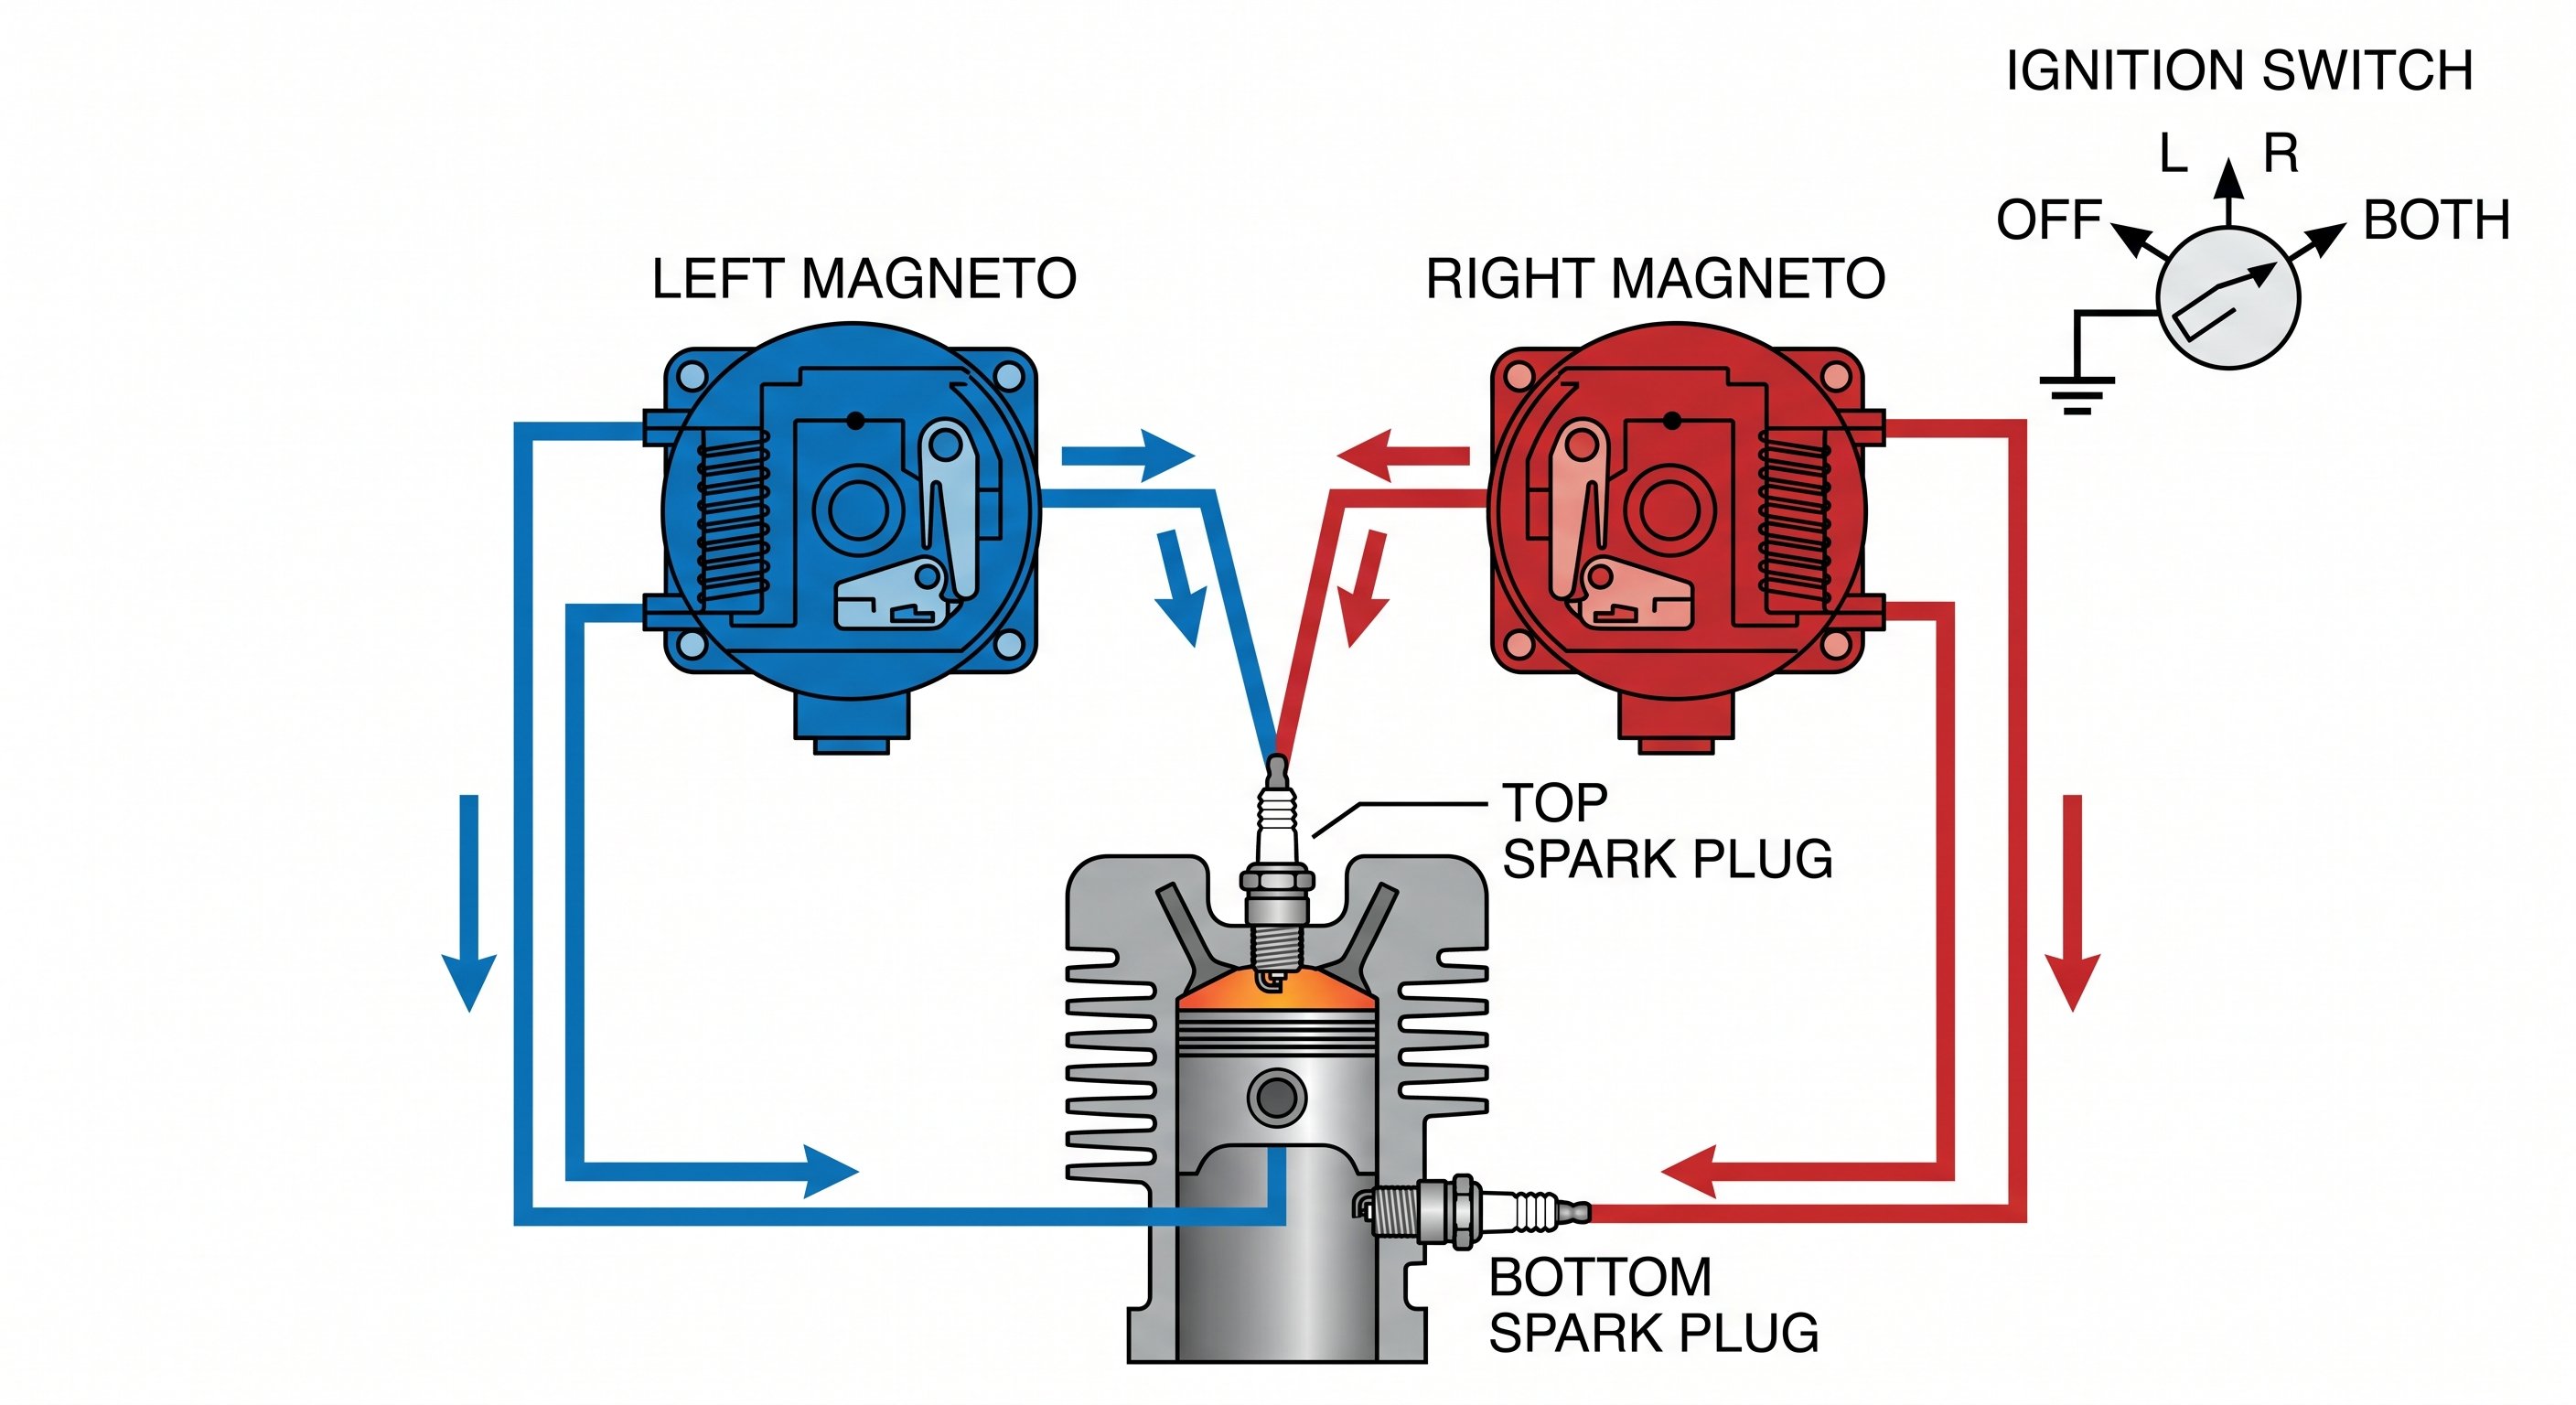
Dual magneto system — each magneto fires one plug per cylinder independently of the battery
How a Magneto Works
A magneto is a self-contained electrical generator driven directly by the engine's rotation. Inside, a permanent magnet spins past a coil of wire, generating alternating current. This AC is stepped up by a transformer coil to extremely high voltage — enough to jump the gap at the spark plug tip. Because the magneto generates its own power from engine rotation, it operates completely independently of the aircraft's battery and alternator. This is why the engine continues running even during a complete electrical failure.
Each magneto fires one of two spark plugs per cylinder. The dual-plug, dual-magneto system provides redundancy and improves combustion efficiency. By firing from two points simultaneously, the fuel-air mixture burns more completely and evenly across the cylinder, producing slightly more power and running cooler. This is why a single-magneto RPM drop during runup is acceptable within limits — the engine is still running on four plugs per cylinder, just one per cylinder instead of two.
The Magneto Check
During the runup, you test each magneto by switching from BOTH to LEFT, noting the RPM drop, then returning to BOTH before switching to RIGHT. The typical acceptable RPM drop is 125 RPM maximum on either magneto, with no more than 50 RPM differential between the two. These limits vary by aircraft — always check the POH.
A larger-than-normal RPM drop indicates a problem with that magneto or its plugs — fouled plugs, a timing issue, or a failing magneto. A zero RPM drop is actually more dangerous than a large drop. It means the magneto is not grounding when the key is moved to the OFF position — a "hot mag." With a hot mag, the engine can fire if the propeller is moved even slightly with the key in the OFF position. This is why you always treat the propeller as if it's live, and why hand-propping requires special training and extreme caution.
P-Lead and Grounding
The key switch doesn't turn the magnetos on — it grounds them out. A magneto is "on" by default as long as the engine is turning. The P-lead (primary lead) connects the magneto to the ignition switch. When you turn the key to OFF, you're completing a ground circuit through the P-lead, preventing the magneto from firing. If the P-lead breaks or disconnects, the magneto becomes permanently "hot" — it will fire regardless of key position. This is one reason you always check for RPM drop during runup: a dead magneto (no drop) might have a broken P-lead rather than a failed magneto.
After engine shutdown, always turn the mixture to idle cutoff before turning the key to OFF. This ensures the engine stops from fuel starvation rather than ignition cutoff. If a P-lead is broken and you shut down with the key only, the magneto is still live — bumping the prop could restart the engine.
Spark Plug Fouling
Lead deposits from 100LL avgas accumulate on spark plug electrodes over time, reducing their ability to fire reliably. Running too rich at low power settings (common during taxi and low-altitude cruise) accelerates fouling. If a magneto check shows excessive RPM drop, running at higher power briefly — or leaning more aggressively at cruise — can burn off deposits. If the RPM drop exceeds limits after this, maintenance is required before flight.
Lesson 3 — Carburetor Ice
Carburetor icing is one of the most insidious engine hazards because it can develop rapidly in conditions that seem benign. The carburetor venturi creates a pressure drop that causes a temperature drop of up to 70°F below ambient air temperature. Combined with moisture in the air, this can cause ice to form inside the carburetor throat and block airflow — even when outside temperatures are well above freezing.
Carburetor ice is most likely when outside air temperature is between 20°F and 70°F (-7°C to 21°C) with high relative humidity. The first symptom in a fixed-pitch propeller aircraft is an unexplained RPM decrease. In a constant-speed propeller aircraft, manifold pressure drops while RPM holds steady.
The remedy is carburetor heat — a valve that routes air heated by the exhaust manifold around the carburetor. When carb heat is applied with ice present, expect the engine to run rough initially as the ice melts and passes through as water, then RPM rises above the pre-icing reading as the restriction clears. That RPM rise above the original setting confirms ice was present.
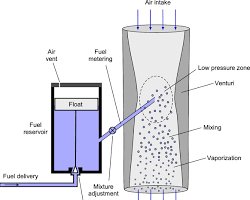
Carburetor ice forms in the venturi throat — the temperature drop can be 70°F below ambient
Why Carburetor Icing Is So Dangerous
Carburetor ice is uniquely dangerous because it forms in conditions that feel safe. Outside air temperature of 50–70°F with visible moisture — a pleasant spring day — is actually the highest-risk condition. Pilots expecting ice only in cold weather are caught off guard. The ice forms silently, the engine runs rough or loses power gradually, and if not caught early, the ice can completely block the venturi and stop the engine.
The physics are straightforward: the carburetor venturi accelerates airflow, which drops pressure, which drops temperature — by as much as 70°F. If that temperature drop crosses the freezing point and moisture is present, ice forms on the venturi walls and throttle plate. A small amount of ice significantly restricts airflow and creates a lean mixture. As more ice forms, the restriction grows and the engine progressively loses power.
Recognition in Different Aircraft
In a fixed-pitch propeller aircraft, the first indication is a gradual RPM decrease with no throttle change. The RPM drop can be subtle — 50 to 100 RPM initially — and easy to miss if you're not actively monitoring the tachometer. In a constant-speed propeller aircraft, RPM holds steady while manifold pressure drops, since the governor compensates. This makes recognition harder in constant-speed aircraft because the most obvious symptom (RPM change) is masked.
Other indications include rough engine operation, engine vibration, and in severe cases, loss of power significant enough to affect climb or cruise performance. At low power settings (descent, approach), the risk is highest because the throttle plate is nearly closed, the venturi effect is strong relative to airflow, and pilots are distracted with approach tasks.
Applying Carb Heat Correctly
Carb heat routes air that has been warmed by the exhaust manifold around the carburetor, raising the temperature enough to melt ice and prevent formation. When you apply carb heat, the RPM initially drops — you've replaced filtered, dense cold air with warmer, less dense air, leaning the mixture slightly. If ice is present, the RPM drops further and the engine runs rough as the melting ice passes through as water. Then, as the restriction clears, RPM rises — and crucially, rises above the pre-carb-heat RPM. That rise above the original reading confirms ice was present.
If no ice is present, carb heat causes only the initial density drop — a small, steady RPM reduction with no roughness and no subsequent rise. In this case, turn carb heat off to restore full power and filtered air. Never take off with carb heat on — you're feeding unfiltered, warm air to the engine, which reduces power and risks ingesting debris.
When to Use Carb Heat
In carb-icing-prone conditions — anytime the temperature-dewpoint spread is less than 20°F, visible moisture is present, or conditions match the carburetor icing probability chart — apply carb heat proactively. During power reductions (entering the pattern, descending), apply it before reducing power. At low power for extended periods (long descents), monitor closely and apply carb heat periodically. During cruise in icing conditions, apply it continuously or check every 5–10 minutes.
Fuel-injected engines do not have carburetors and are not susceptible to carburetor ice. However, they can experience induction icing (ice in the air intake), which is handled differently. Know which type of engine your aircraft has — this affects your weather decision-making and the checklists you follow.
Lesson 4 — The Fuel System
Most training aircraft use a gravity-fed or engine-driven pump fuel system with two wing tanks and a selector valve allowing LEFT, RIGHT, BOTH, or OFF positions. For takeoff and landing, the selector is always set to BOTH so both tanks feed equally. This prevents an unbalanced fuel load and ensures maximum fuel availability during the most critical phases of flight.
Aviation gasoline (avgas) is color-coded for identification. 100LL (100 octane Low Lead) is dyed blue and is the most common avgas used in piston aircraft. Jet-A turbine fuel is clear or straw-colored. Misfueling with Jet-A in a piston aircraft is catastrophic — the engine will not run correctly and will likely fail shortly after takeoff.
Before every flight, drain a small amount of fuel from each sump drain point (tanks and gascolator) into a fuel tester. Check for water (which sinks to the bottom and appears as a distinct layer or bubbles), contamination, and correct color. Water in aviation fuel is far more common than most pilots realize, especially after rain or temperature swings that cause condensation in partially-filled tanks.
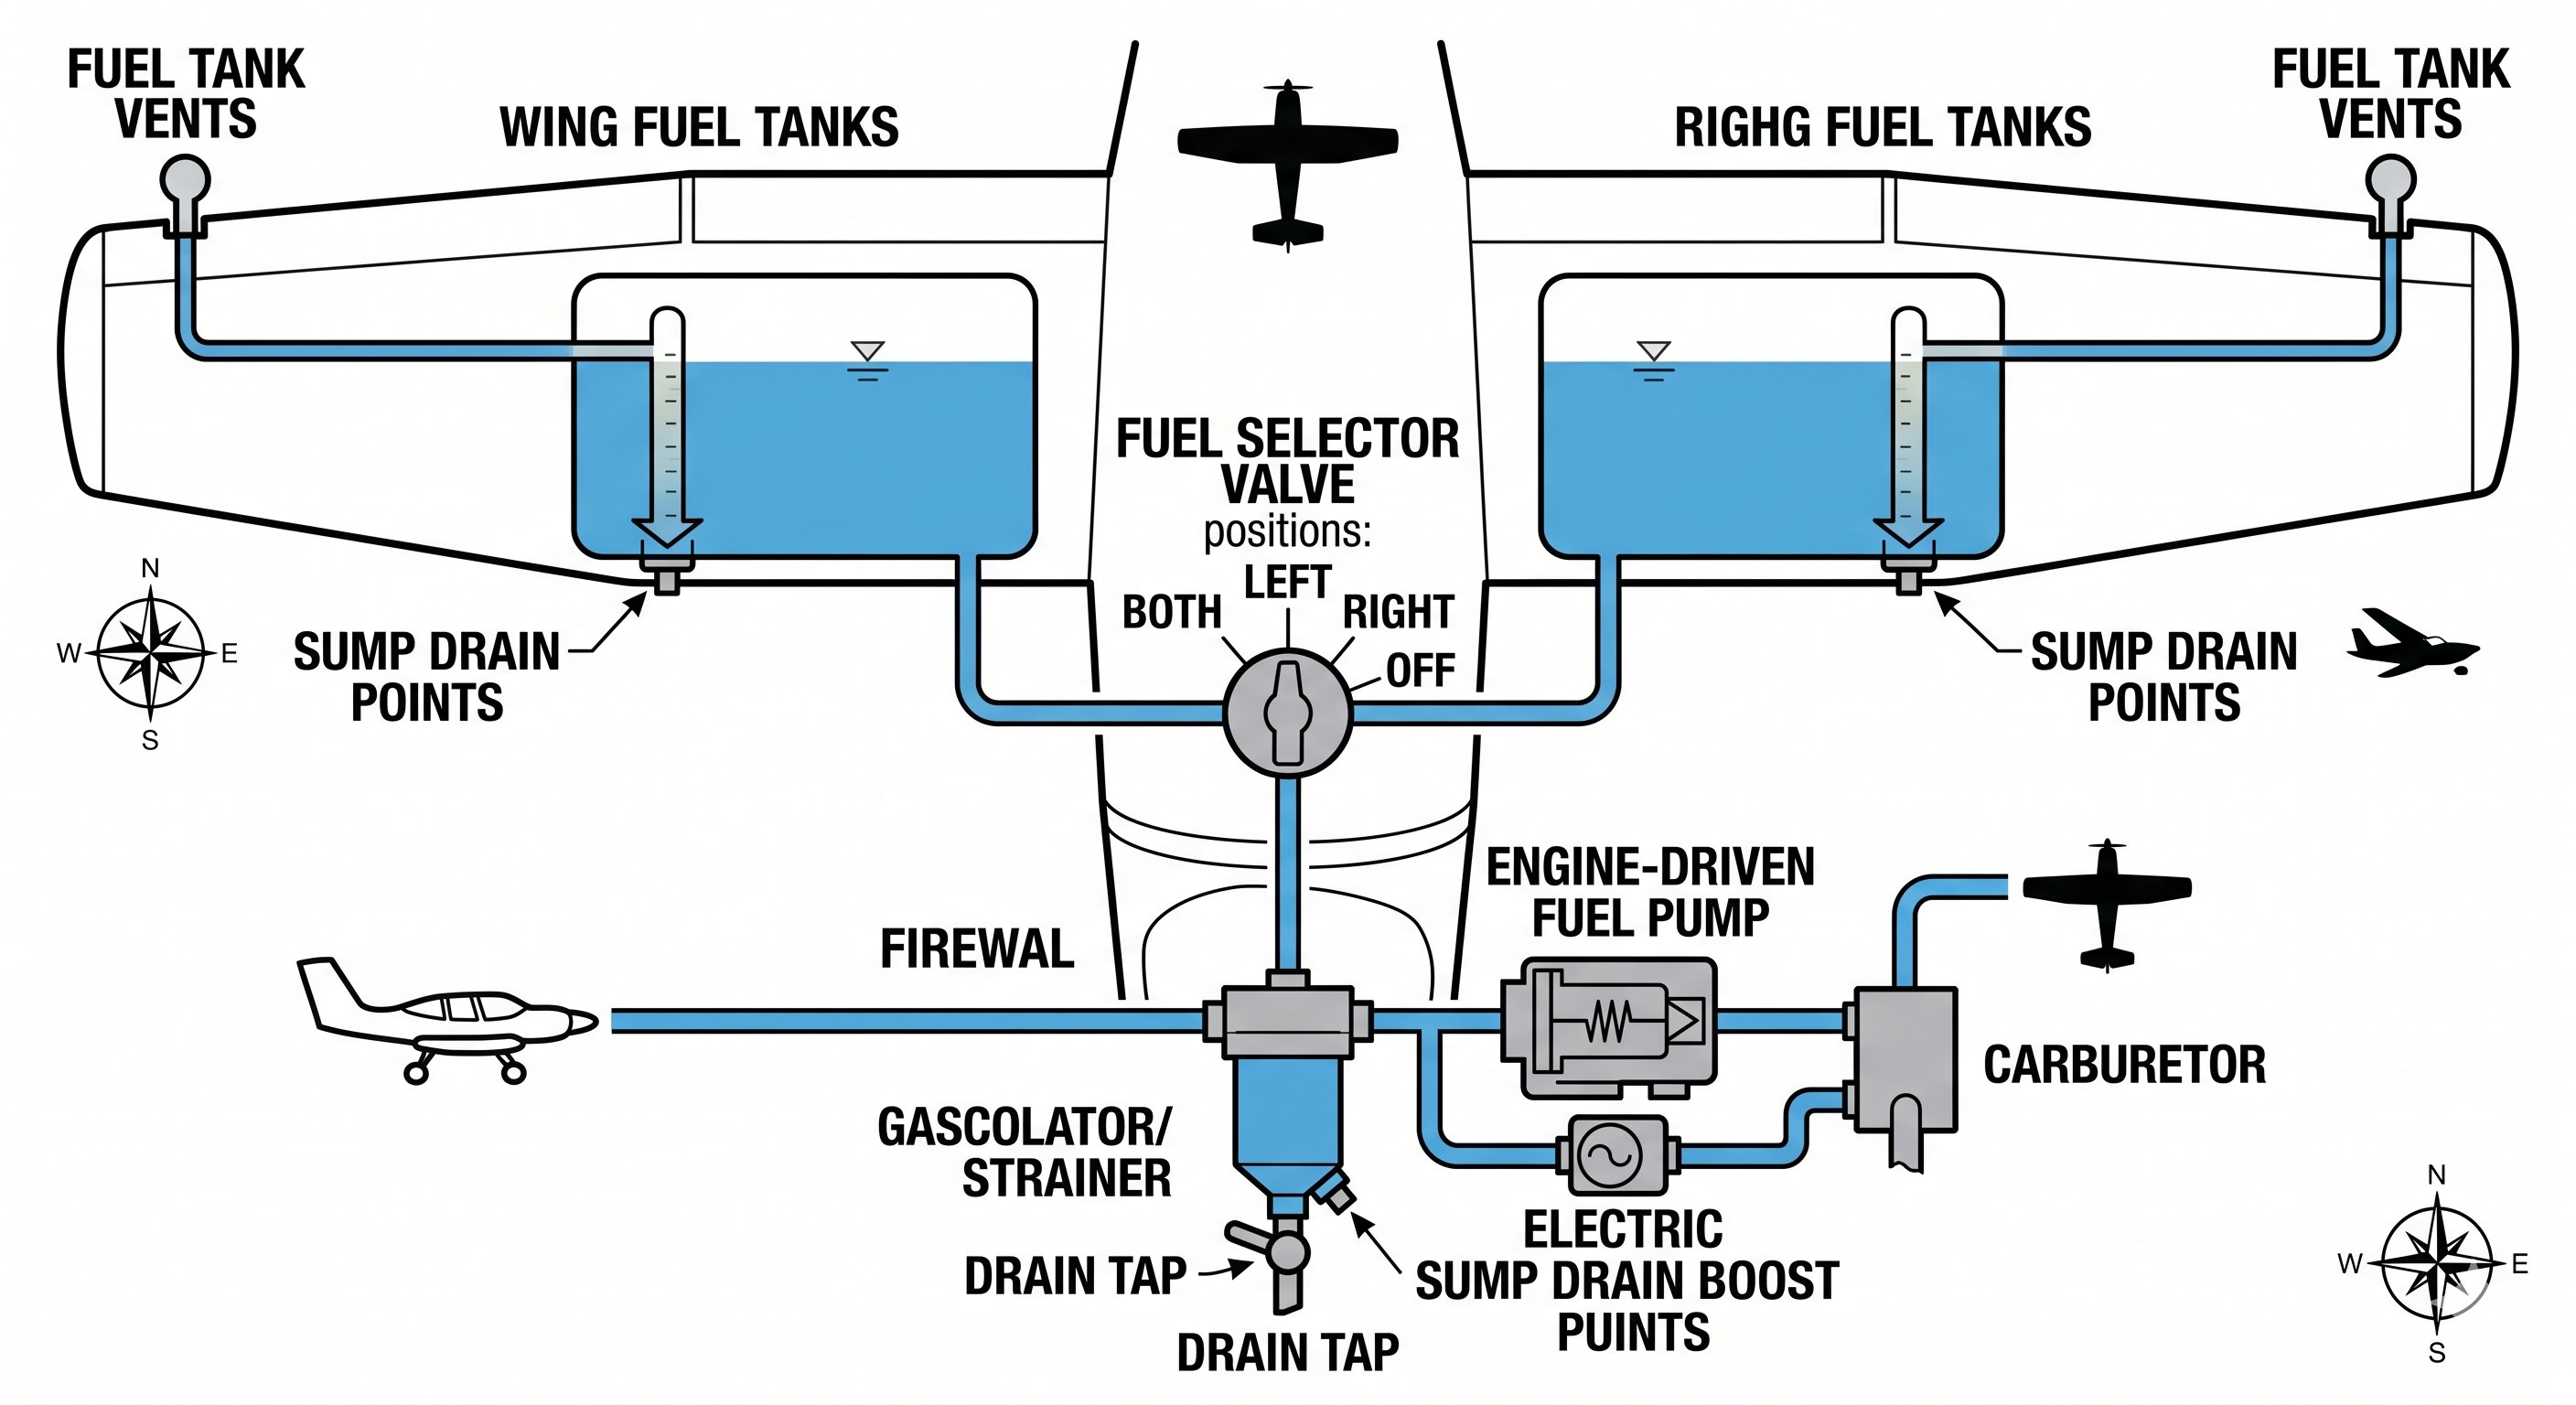
Fuel system flow — from tanks through selector valve, strainer, and pump to the carburetor
Fuel System Architecture
Most single-engine training aircraft use a gravity-fed fuel system with two wing tanks feeding through a selector valve. The selector positions are LEFT, RIGHT, BOTH, and OFF. For all takeoffs and landings, the selector must be on BOTH — this ensures maximum fuel availability and prevents unbalanced fuel loading. During cruise, some pilots alternate tanks to maintain balance, but the POH will specify the approved procedure for each aircraft.
The gascolator (fuel strainer) is located at the lowest point of the fuel system, just before the carburetor or fuel control unit. It collects water and sediment that settle out of the fuel. Before every flight, you drain the gascolator along with each tank's sump drain point to check for water contamination, sediment, and correct fuel color. Water sinks to the bottom and appears as a distinct layer or as bubbles — it has a different refraction than fuel. Never fly until the sample runs clear and the correct color.
Fuel Grades and Colors
100LL (100 Low Lead) is dyed blue and is the most common avgas in general aviation. The "100" refers to the octane rating, which determines the fuel's resistance to detonation under compression. The "LL" means low lead — it still contains tetraethyl lead as an anti-knock additive, but less than the old 100/130 grade it replaced. Jet-A is clear to straw-colored and is a kerosene-based turbine fuel. Misfueling a piston aircraft with Jet-A is a serious emergency — the engine may run briefly, then fail, because Jet-A has a much higher flash point and won't ignite properly in a piston engine. The engine will not run correctly and will likely fail shortly after takeoff.
The color coding system exists precisely to prevent misfueling. Avgas nozzles are smaller than Jet-A nozzles, making it physically difficult (though not impossible) to put Jet-A in a piston aircraft. However, a turbine aircraft can inadvertently be fueled with avgas — the nozzle fits — so the color system and preflight fuel check are your primary defenses.
Fuel Venting and Vapor Lock
Fuel tanks must be vented to atmosphere to allow fuel to flow as the level drops. Without venting, negative pressure builds in the tank as fuel is consumed, eventually stopping fuel flow — fuel starvation from a blocked vent is a known accident cause. Check that fuel vents are clear during preflight. On hot days, fuel can vaporize in the fuel lines (vapor lock), creating an interruption in fuel flow. This is more common in high-temperature environments and can occur after a hot engine shutdown and restart. Proper engine priming procedures help address this.
Fuel Management in Practice
Most fuel-related accidents are caused by exhaustion (running out of fuel) or mismanagement (wrong tank selected, imbalanced tanks). Always calculate fuel required versus fuel on board with an adequate reserve before every flight. FAR 91.151 requires VFR day flights to carry enough fuel to reach the destination plus 30 minutes at cruise, and VFR night flights require 45 minutes reserve. These are minimums — good practice is to carry significantly more.
Tab markings inside tanks indicate specific fuel quantities — learn what each tab represents in gallons for your aircraft. Fuel gauges in small aircraft are notoriously inaccurate, especially near empty. The only reliable reading is "full" — confirmed by visual inspection. Never rely solely on gauges for fuel planning. Always visually verify fuel quantity before flight.
| Fuel Type | Color | Octane | Used In |
|---|---|---|---|
| 100LL | Blue | 100 | Most piston aircraft |
| 100 (high lead) | Green | 100 | High-compression pistons |
| Jet-A | Clear/straw | N/A | Turbine engines only |
| Mogas (auto) | Varies | 87–93 | Some approved piston aircraft |
Lesson 5 — The Pitot-Static System
Three of the six primary flight instruments — the airspeed indicator, altimeter, and vertical speed indicator — are driven by the pitot-static system. The pitot tube measures ram air pressure (dynamic pressure created by forward motion). The static port measures ambient atmospheric pressure. The difference between the two drives the airspeed indicator; the static pressure alone drives the altimeter and VSI.
Understanding blockage effects is critical for the written exam and oral:
- Blocked pitot tube (static open): Airspeed indicator only is affected. In level flight, airspeed freezes. In a climb, airspeed reads lower than actual. In a descent, airspeed reads higher than actual — because the static port shows lower pressure (higher altitude) while the pitot is stuck.
- Blocked static port (pitot open): All three instruments are affected. The airspeed indicator, altimeter, and VSI all freeze or behave abnormally. The alternate static source (usually a valve in the cabin) bypasses the blocked port.
- Both blocked: All three instruments are unreliable.
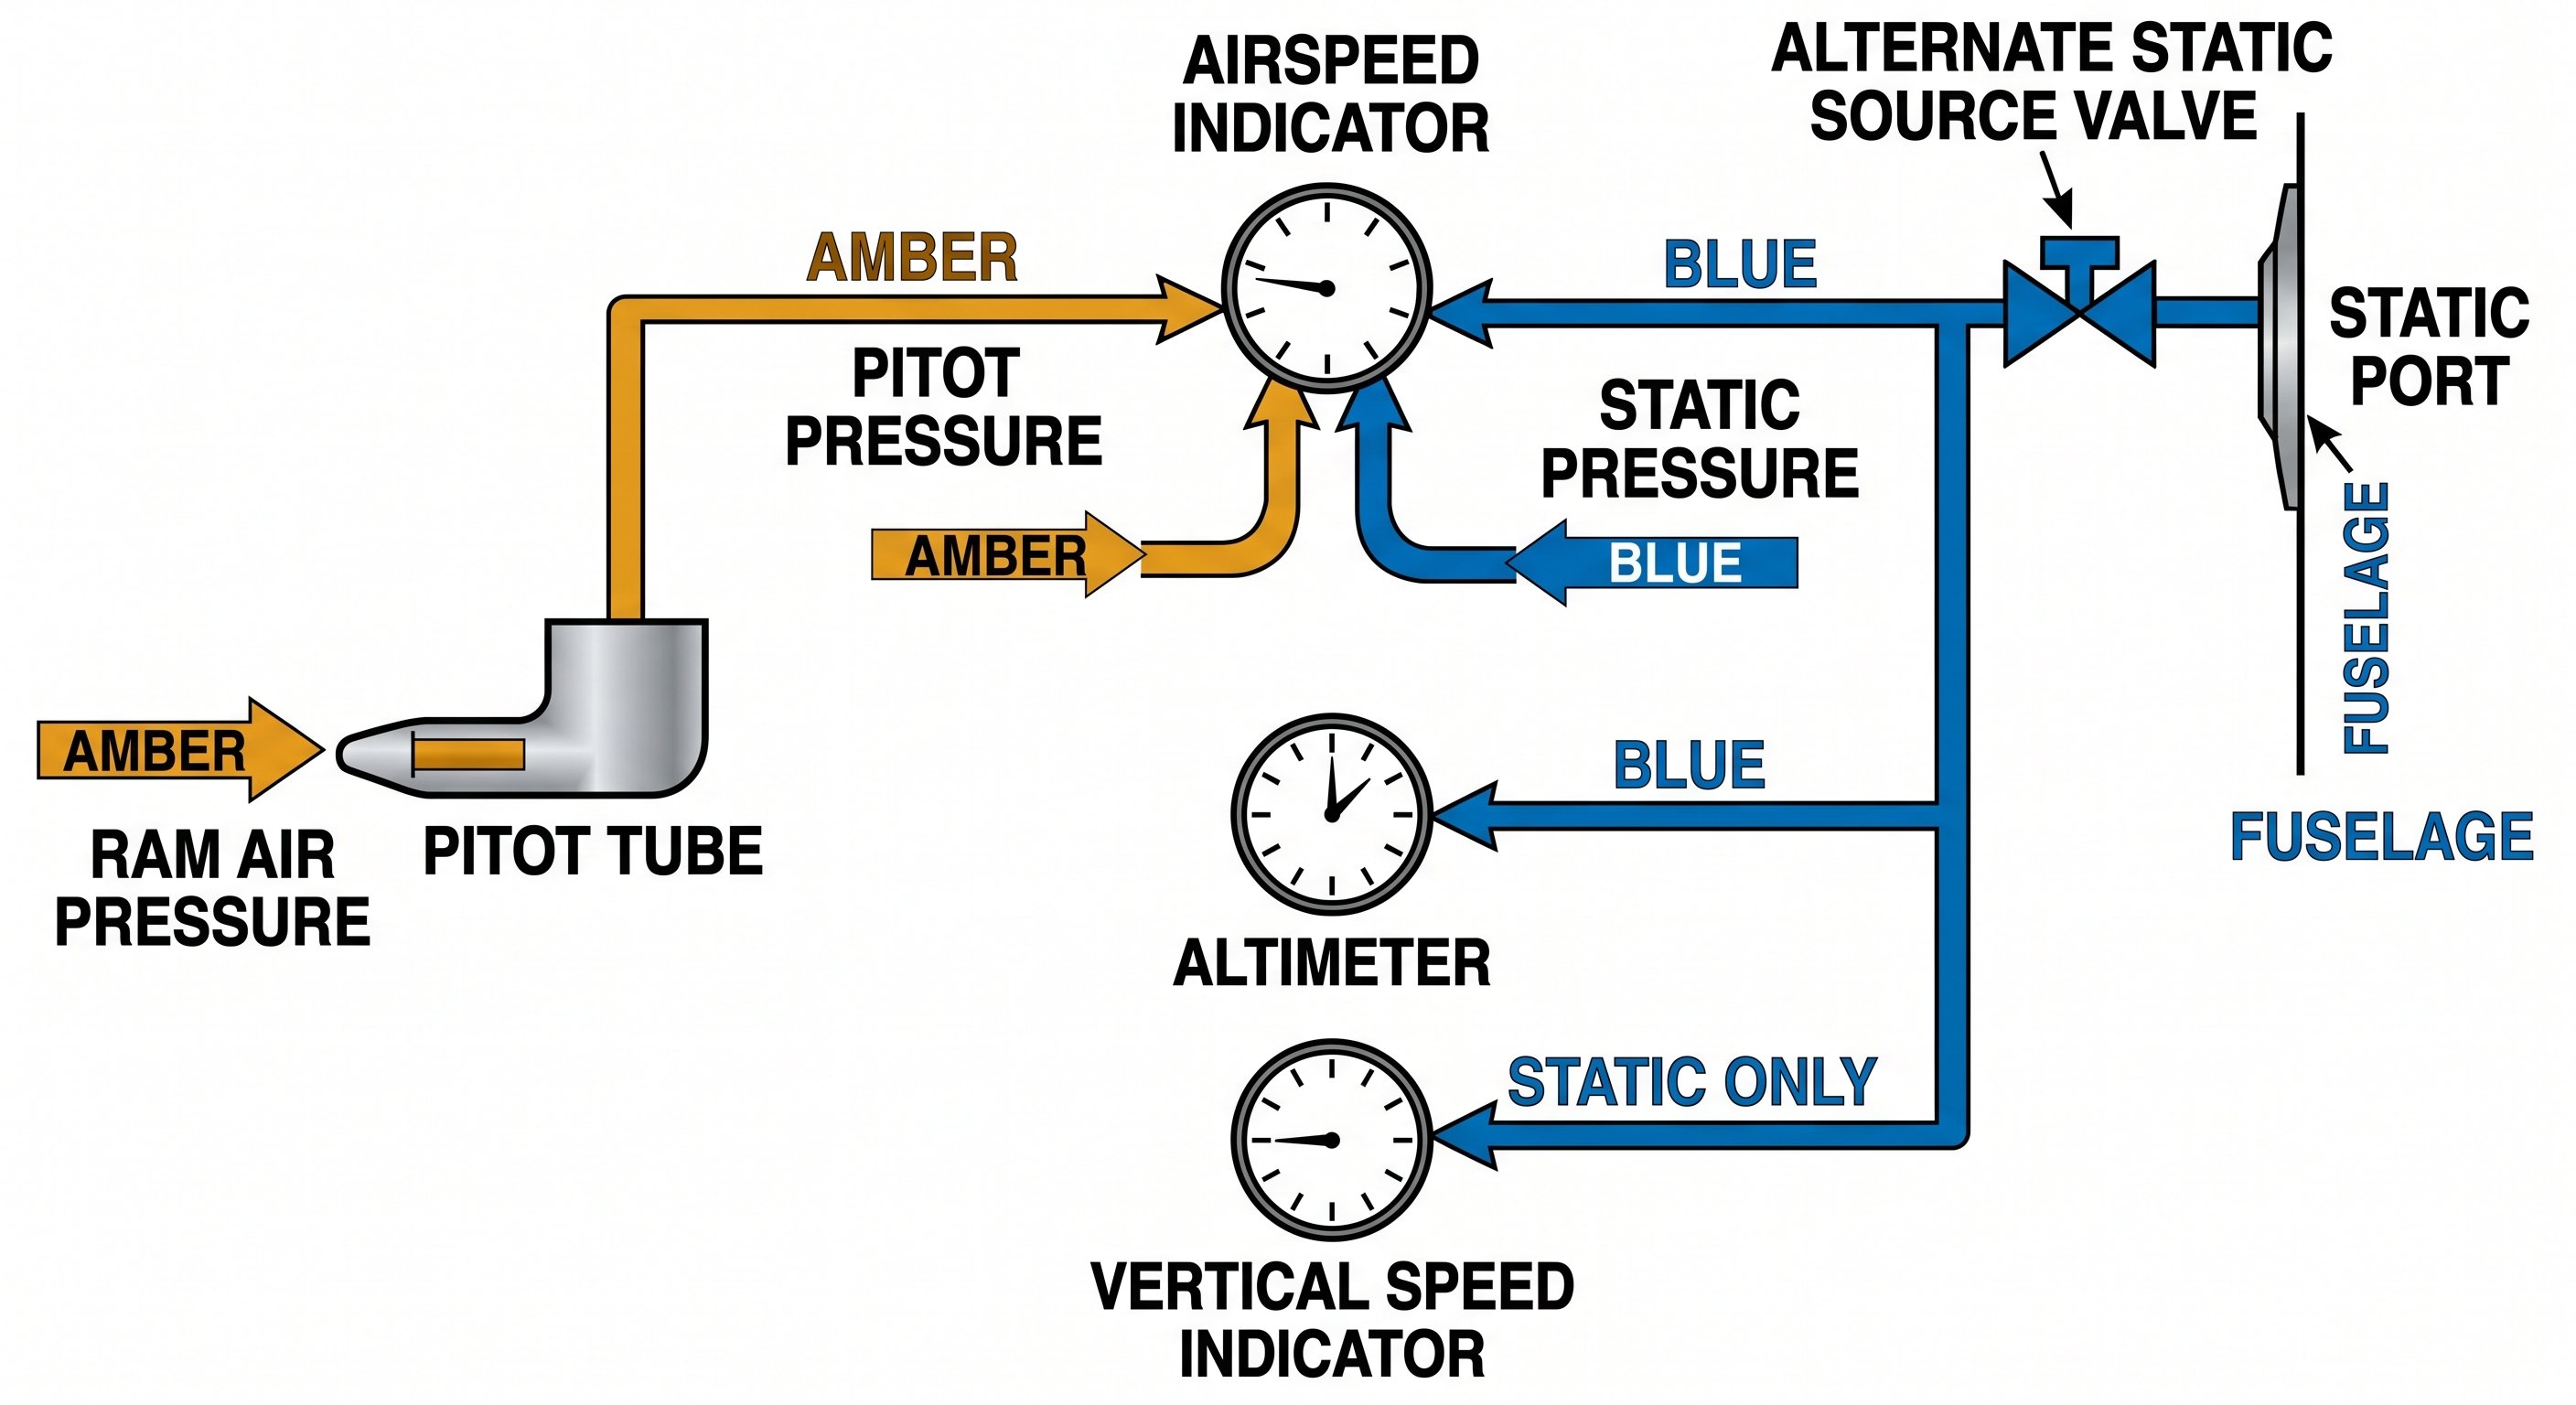
Pitot-static system — understand which instruments lose which inputs during blockages
How the System Works
The pitot-static system provides pressure data to three flight instruments: the airspeed indicator, altimeter, and vertical speed indicator. The pitot tube faces forward into the airflow, capturing total pressure (dynamic pressure from aircraft motion plus ambient static pressure). The static port — usually flush-mounted on the fuselage side — measures only ambient atmospheric pressure. The difference between pitot (total) pressure and static pressure is dynamic pressure, which drives the airspeed indicator needle.
The altimeter and VSI use only static pressure. As altitude increases, static pressure decreases in a predictable relationship defined by the International Standard Atmosphere. The altimeter is essentially a barometer calibrated in feet. When you set the Kollsman window (altimeter setting), you're adjusting for the actual local sea-level pressure, correcting the instrument to read field elevation when on the ground.
Blockages and Their Effects
Understanding what happens when each part of the pitot-static system is blocked is heavily tested on the FAA written exam and critical for actual emergencies.
Pitot tube blocked (static port open): The airspeed indicator is affected. If blocked on the ground and you take off, the trapped pressure remains constant. As you climb, decreasing static pressure makes the airspeed indicator over-read (higher than actual). In descent, it under-reads. Think of it this way — the static pressure reference is getting lower as you climb, making the pressure differential larger, which the instrument reads as higher speed.
Static port blocked (pitot tube open): All three instruments are affected. Airspeed indicator reads incorrectly (under-reads in a climb, over-reads in descent). Altimeter freezes at the altitude where blockage occurred — a critically dangerous failure in IMC. VSI freezes at zero and shows no vertical trend information. The alternate static source (if equipped) provides access to cabin static pressure as a backup, usually reading slightly higher altitude than the primary.
Both pitot and static blocked: Airspeed indicator reads zero. Altimeter and VSI freeze. This can occur when pitot heat is not applied in icing conditions.
Pitot Heat
The pitot tube is heated electrically to prevent ice accumulation in visible moisture and near-freezing temperatures. Pitot heat is required equipment for IFR flight. In VFR flight, apply pitot heat proactively any time you're flying in clouds, visible moisture, or temperatures near freezing. The pitot tube can ice over quickly — within seconds in severe icing — causing a sudden airspeed indication failure. Check that pitot heat is working during preflight: apply it briefly and verify the tube warms up. Never leave pitot heat on during ground operations for extended periods — it can overheat without airflow cooling it.
Altimeter Errors
Even with a correct altimeter setting, pressure altitude differs from true altitude when temperatures deviate from standard. In cold weather, the atmosphere is denser than standard, and the aircraft is lower than indicated — the altimeter over-reads. This matters when operating near terrain in cold temperatures: "High to low, watch below" — flying from high pressure to low pressure (or high temperature to low temperature) without updating the altimeter setting means the aircraft is lower than indicated. Minimum safe altitudes in cold weather operations must account for this temperature correction.
Lesson 6 — The Electrical System
Most training aircraft use a 14-volt or 28-volt DC electrical system powered by an alternator driven by the engine, with a battery as backup. The alternator maintains electrical power and recharges the battery during flight. The battery provides starting power and serves as a backup if the alternator fails.
The ammeter shows the status of the charging system. A positive reading means the alternator is producing power. A negative reading (discharge) means the battery is supplying power — the alternator has failed or is insufficient. The low-voltage warning light illuminates when system voltage drops below a threshold, also indicating alternator issues.
If the alternator fails in flight, you are running on battery only. Reduce electrical load immediately by turning off all non-essential avionics, lights, and equipment. Estimate battery remaining time and plan to land soon. A fully charged 24 amp-hour battery in a typical Cessna 172 provides approximately 30 minutes of power at reduced load.
In an alternator failure, the ammeter shows a negative reading or the low-voltage light illuminates. Reduce electrical load immediately — turn off non-essential equipment. The battery provides roughly 30–60 minutes of power depending on load. Declare if necessary and land as soon as practical.
A complete electrical failure means losing all electrically-powered instruments and radios. In VMC this is manageable — the magnetos keep the engine running. In IMC it becomes an emergency. Know which instruments are electric and which are vacuum-driven so you understand exactly what you've lost.
System Architecture
The typical training aircraft electrical system runs on 14 volts DC (some larger aircraft use 28V). The alternator, belt-driven from the engine, is the primary power source during flight. It maintains system voltage and recharges the battery. The battery serves three purposes: engine starting, providing power when the engine isn't running, and acting as a buffer/backup if the alternator fails or load briefly exceeds alternator output.
The master switch in most small aircraft is actually two switches combined — a battery master (connects the battery to the electrical bus) and an alternator master (connects the alternator to the electrical bus). They're usually on a split rocker switch. Turning off the alternator half allows you to isolate a malfunctioning alternator while keeping battery power. The bus bar is the central distribution point — all aircraft systems tap power from it, through circuit breakers or fuses that protect each circuit from overcurrent.
Reading the Ammeter
The ammeter shows the state of the charging system. In a typical installation, a positive reading (needle right of center) means the alternator is producing power and the battery is charging. A negative reading (needle left of center) means the battery is discharging — the alternator is not producing enough power or has failed. In some aircraft, the ammeter shows only alternator output; in others, it shows the charge/discharge state of the battery. Know which type your aircraft has.
After engine start, the ammeter should show a positive charge as the alternator replenishes battery power used for starting. During normal cruise, the ammeter should read slightly positive or near zero — the alternator meeting the load with a small charge surplus. An unexpectedly high positive reading could indicate the battery was deeply discharged (normal after a long start) or a regulator issue. An unexpectedly high negative reading in flight means alternator failure.
Alternator Failure in Flight
When the alternator fails, the low-voltage warning light illuminates (if equipped) and the ammeter goes negative. You are now running entirely on battery. Immediately reduce electrical load by shedding non-essential equipment: landing lights, strobes, unnecessary avionics, cabin heat blower. Prioritize what you need: communication radio, primary navigation, transponder. Calculate time to destination versus estimated battery life. A 24-amp-hour battery at 10 amps draw gives roughly 1.4 hours — but your actual load may be higher and batteries are rarely at full charge.
Plan to land as soon as practical. If you are IFR, declare an emergency. If VFR, divert to the nearest suitable airport. Preserve battery power for landing — you may need flaps, nav lights, and radio for approach and landing clearance.
Circuit Breakers
Circuit breakers protect individual electrical circuits from overload and short circuits. A tripped breaker pops out. The general rule is to wait 2 minutes before resetting a tripped breaker once — if it trips again, do not reset it. A repeatedly tripping breaker indicates a fault in that circuit. Resetting it forces current through a potentially damaged or shorted wire, which can cause fire. Know which circuit breaker controls which system in your aircraft — this is part of systems knowledge the DPE will test in the oral exam.
Lesson 7 — The Vacuum System
The attitude indicator and heading indicator are gyroscopic instruments — they rely on a rapidly spinning gyroscope to maintain a fixed reference in space. In most training aircraft, this gyroscope is spun by suction from an engine-driven vacuum pump. The vacuum gauge in the cockpit shows system suction, typically 4.5–5.5 inches of mercury for proper gyro operation.
When the vacuum system fails (pump failure is not uncommon), the attitude indicator and heading indicator slowly lose accuracy as the gyros spool down. This can take several minutes — which is why partial panel training is required for instrument flight. The turn coordinator is typically electrically powered and remains operational during vacuum failure, providing a backup attitude reference.
Why Gyroscopic Instruments Need Vacuum
The attitude indicator and heading indicator (directional gyro) rely on rapidly spinning gyroscopes to maintain a fixed orientation in space. A gyroscope spinning at high speed resists changes to its orientation — this property (rigidity in space) is what makes it useful as an attitude reference. The faster and heavier the gyro, the stronger the rigidity. To maintain adequate rigidity, the gyro must spin at 10,000–15,000 RPM continuously during flight. In most training aircraft, this spin is maintained by engine-driven vacuum.
The vacuum pump draws air through the instrument cases. Incoming air is directed at buckets or vanes on the gyro rotor, spinning it like a turbine. The vacuum gauge in the cockpit shows suction in inches of mercury — typically 4.5 to 5.5 inHg for proper gyro operation. Too little vacuum means the gyro spins too slowly, becoming sluggish and unreliable. Too much vacuum can damage the gyro bearings.
Vacuum System Failure
Vacuum pump failure is one of the most common mechanical failures in piston aircraft — dry vacuum pumps have a relatively short service life (500–1,000 hours) and can fail without warning. When vacuum fails, the attitude indicator and heading indicator continue to appear functional for several minutes as the gyros slowly spin down. This is extremely dangerous in IMC — a pilot relying on these instruments may not notice the failure until the gyros have slowed enough to precess and give erroneous indications.
This is the basis of the "partial panel" emergency training requirement. You must be able to fly the aircraft using only the remaining instruments: airspeed indicator, altimeter, VSI, magnetic compass, and turn coordinator (which is electrically powered in most aircraft). The turn coordinator uses a different principle (rate gyro) and is typically on the aircraft's electrical system, making it available even after vacuum failure.
Attitude Indicator Errors
The attitude indicator has known errors related to precession and acceleration. During a prolonged coordinated turn, gyroscopic precession causes the horizon bar to show a slight climb indication. This is called turning error or gimbal error. During acceleration on the ground, the attitude indicator may show a slight nose-up pitch. During deceleration, a slight nose-down pitch. These errors are small and transient in normal operations but can be significant under unusual attitudes or during long turns.
Before takeoff, check that the attitude indicator is erect — the horizon bar should be level (within approximately 5°) after warming up for a few minutes. After unusual attitude recovery, the attitude indicator may take a moment to stabilize. Cross-check with other instruments before trusting it fully.
Heading Indicator Precession
The heading indicator (directional gyro) is not north-seeking — unlike the magnetic compass, it has no inherent reference to magnetic north. It must be set to the magnetic compass heading during preflight, and reset approximately every 15 minutes during flight because gyroscopic precession causes it to drift. The rate of drift varies by instrument and temperature but is typically 3° or less per 15 minutes in a serviceable instrument. In aerobatic flight or prolonged unusual attitudes, drift is significantly higher. If you notice the heading indicator and magnetic compass diverging by more than a few degrees during normal cruise, suspect vacuum issues or instrument wear.
Lesson 8 — Landing Gear and Aircraft Categories
Most training aircraft use fixed tricycle landing gear — a nosewheel plus two main wheels. The nosewheel provides directional control during taxi and prevents nose-overs. The oleo (oil and air) strut in each gear leg absorbs landing shock. Check strut extension during preflight — a flat strut transmits excessive shock loads to the airframe on landing.
Tailwheel (conventional gear) aircraft place the two main wheels forward of the CG and use a small tailwheel aft. Because the CG is behind the main gear, any sideways deviation on the ground creates a destabilizing yawing moment that amplifies — this is the ground loop tendency. Tailwheel aircraft require a special endorsement under FAR 61.31(i).
A complex aircraft has retractable landing gear, a controllable-pitch propeller, and flaps — all three are required. Acting as PIC requires a logbook endorsement per FAR 61.31(e). A high-performance aircraft has more than 200 horsepower and requires a separate endorsement per FAR 61.31(f).
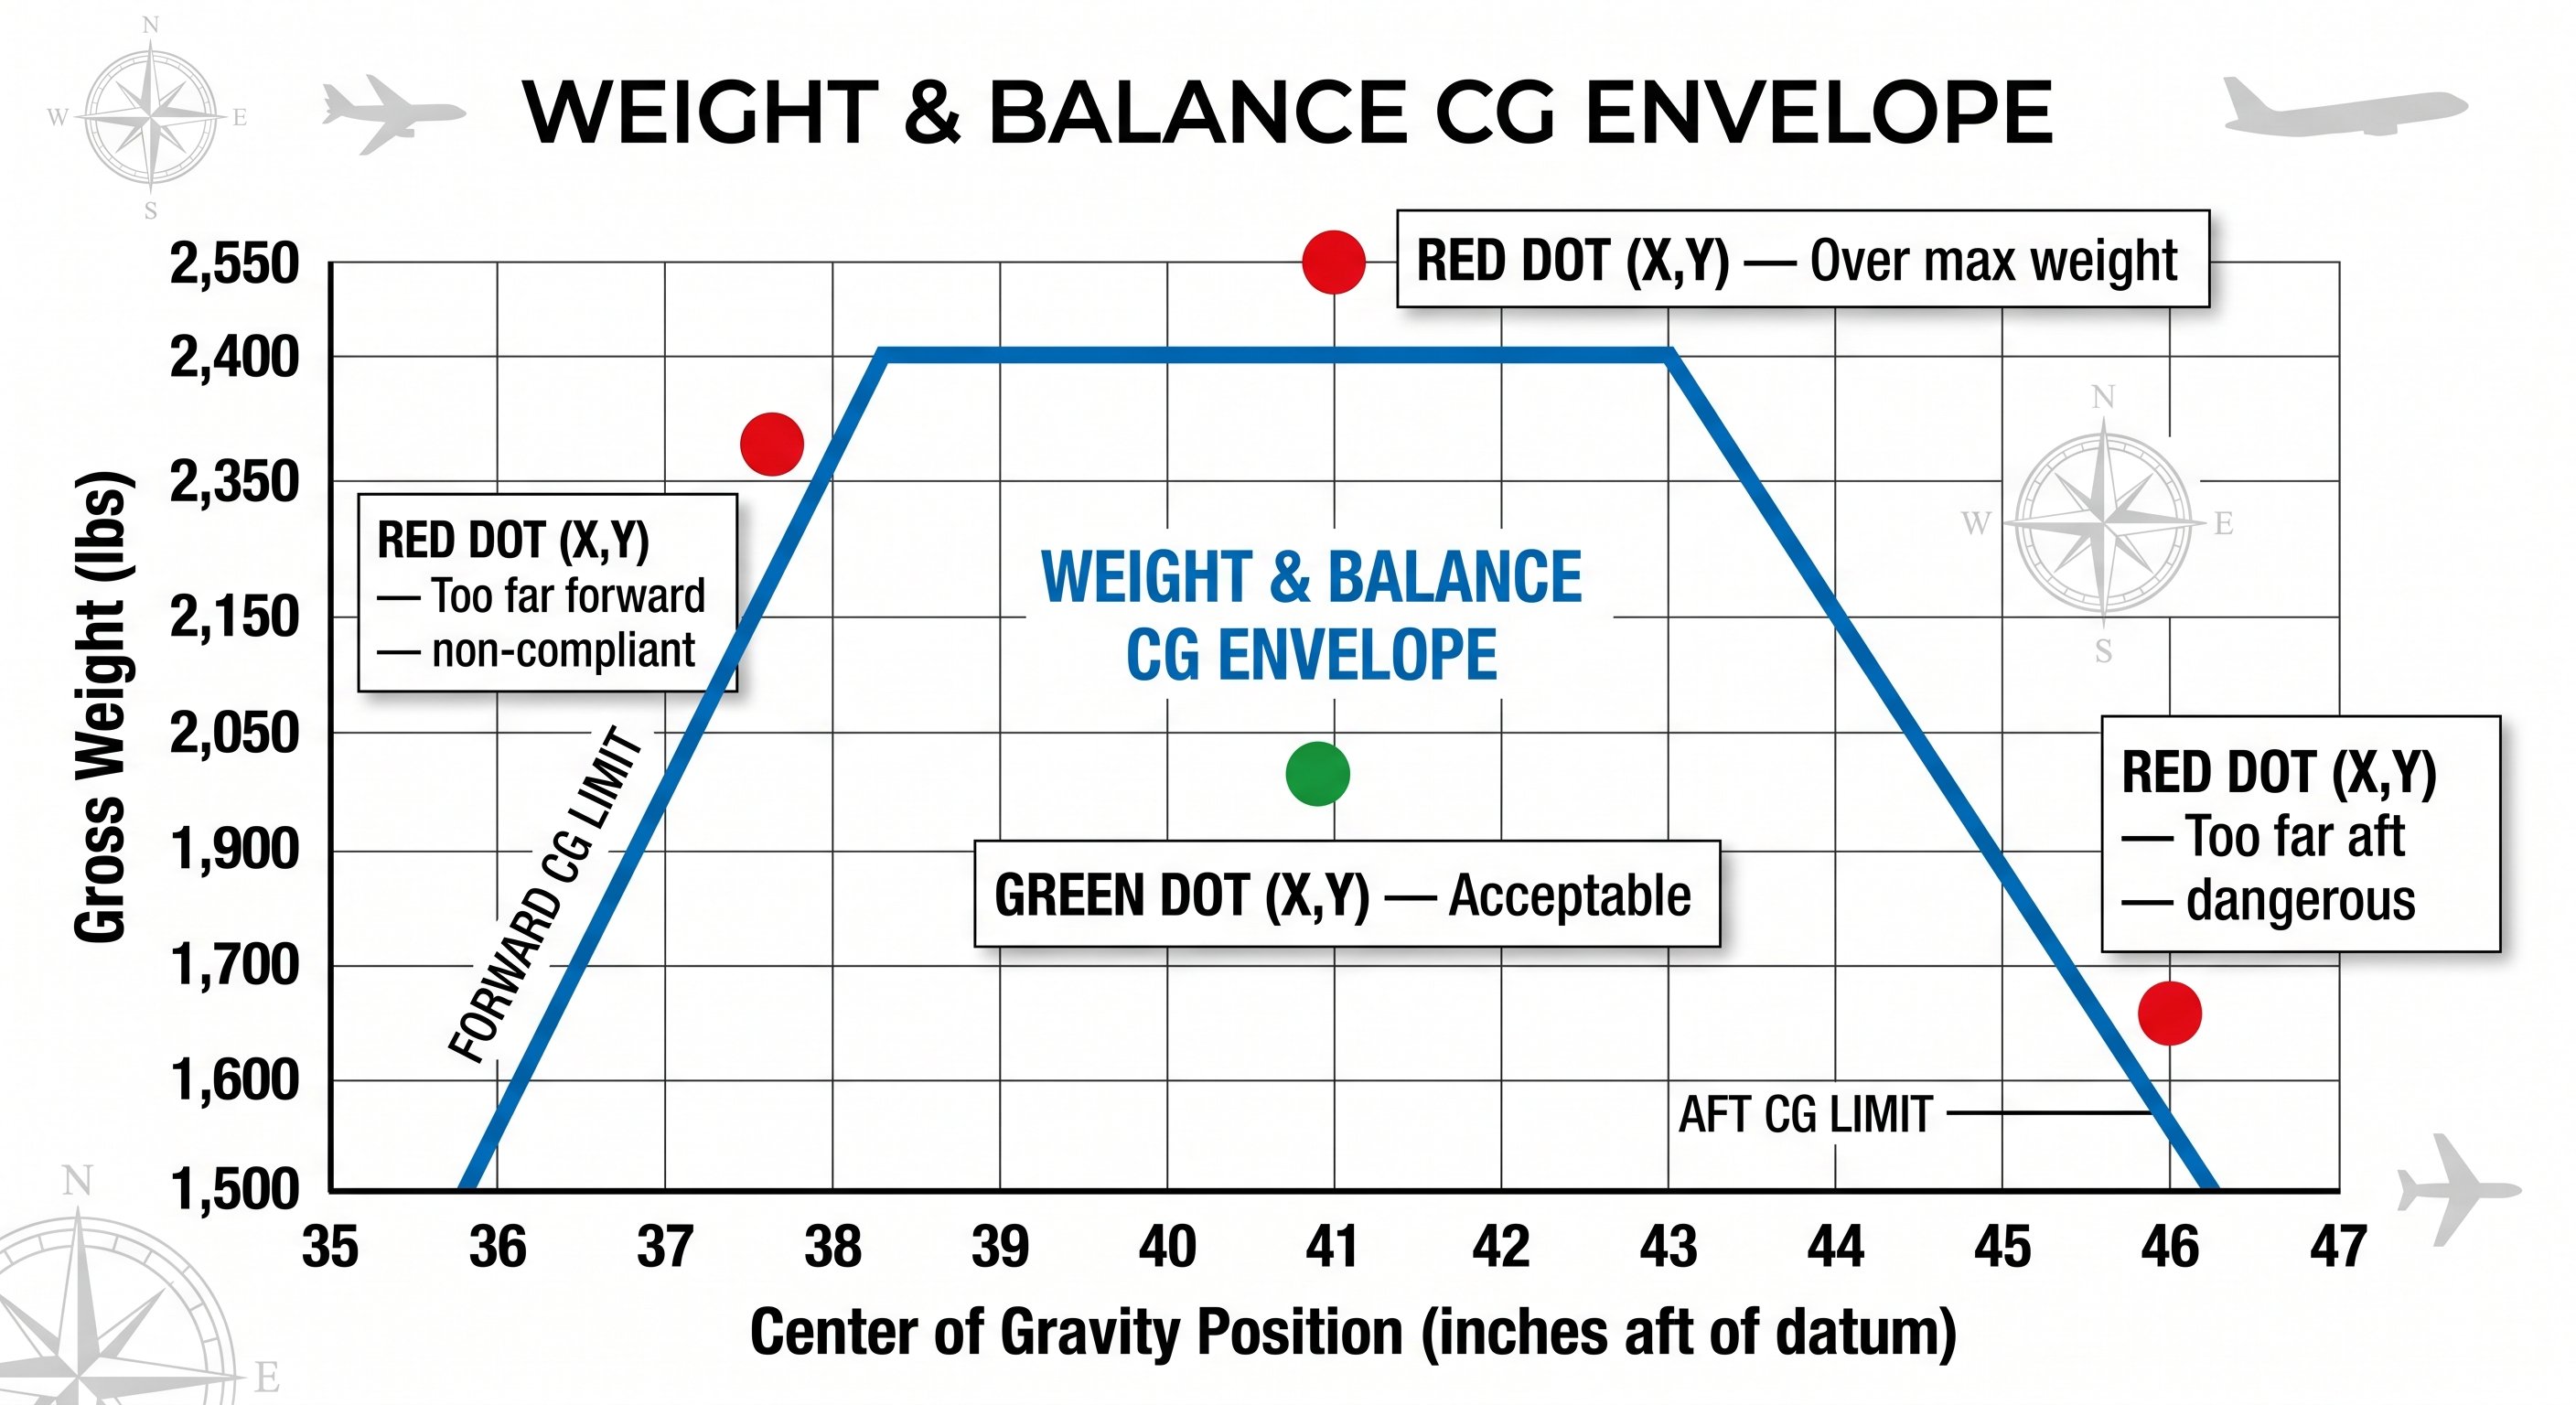
CG envelope — the center of gravity must remain within limits throughout the entire flight
Retractable landing gear adds complexity and a new category of pilot error. The classic accident is a gear-up landing — touching down with the gear retracted, usually from distraction or a skipped checklist. Use the GUMP check before every landing: Gas (fuel selector to BOTH), Undercarriage (gear down and locked — three green lights), Mixture (rich), Props (full forward on constant-speed). Most retractable-gear aircraft have a warning horn that activates when power is reduced with gear up — never silence it until gear position is verified.
Aircraft categories and classes define what you're licensed to fly. Category covers airplane, rotorcraft, glider, and lighter-than-air. Within the airplane category, classes include single-engine land (ASEL), multi-engine land (AMEL), single-engine sea (ASES), and multi-engine sea (AMES). Your Private Pilot certificate with ASEL rating authorizes only single-engine land airplanes. Adding a new class requires an additional rating and checkride. This hierarchy — certificate, category, class, type — appears on the FAA written exam and defines the legal scope of your flying privileges.
Complex and High-Performance Endorsements
A complex aircraft has all three of: retractable landing gear, a controllable-pitch propeller, and flaps. To act as PIC in a complex aircraft, you need a logbook endorsement from an instructor who has flown that aircraft (or a similar complex aircraft) with you. The training covers gear and prop operation, emergency gear extension procedures, and the GUMP checklist. FAR 61.31(e) covers this requirement.
A high-performance aircraft has an engine of more than 200 horsepower. A separate endorsement is required under FAR 61.31(f). Training covers power management — particularly the importance of not reducing manifold pressure below RPM (to avoid detonation in some engines), proper climb and cruise power settings, and throttle technique in variable-pitch propeller aircraft.
Weight and Balance Fundamentals
Every flight requires a weight and balance check. Maximum gross weight limits structural loads — exceeding it compromises the aircraft's ability to handle the design load factors. CG limits are equally critical: the CG must remain within the forward and aft limits throughout the entire flight, not just at takeoff. As fuel burns off, CG shifts — usually aft in wing-tank aircraft as the wings lighten. If the loaded CG is near the aft limit at takeoff, fuel burn may push it beyond the limit during cruise.
Forward CG limit: the aircraft becomes progressively harder to rotate for takeoff and flare for landing as CG moves forward. At the forward limit, full aft elevator may be required for flare, leaving no margin. Stall speed increases with forward CG. Aft CG limit: stability decreases as CG moves aft. At or beyond the aft limit, the aircraft may be unrecoverable from a stall — the tail cannot generate enough downforce to lower the nose. This is the more dangerous limit.
Emergency Gear Extension
All retractable-gear aircraft have an emergency gear extension system for use if the hydraulic or electric gear system fails. The method varies: some aircraft use CO2 bottles, others use a hand pump, others use gravity extension by releasing the uplocks. Know your aircraft's emergency extension procedure before flying it. After an emergency extension, the gear is mechanically locked down but the green light confirmation may or may not illuminate depending on the failure. A low pass by the tower or another aircraft can provide visual confirmation of gear position.
Never trust a single green light as absolute confirmation of locked gear — the light shows the switch position, not necessarily actual mechanical lock. If you have any doubt about gear status, treat it as a potential gear-up landing and execute the appropriate emergency procedures.