Maneuvers and Procedures — What the DPE Will Ask You to Do
This module covers every maneuver on the Private Pilot ACS — the exact standards you must meet, the common errors students make, and the reasoning behind each requirement. Understanding why a maneuver is done a specific way leads to better performance than memorizing steps.
- State the ACS tolerances for all primary checkride maneuvers
- Describe the purpose and procedure for normal, short-field, and soft-field takeoffs and landings
- Explain the steep turn maneuver including why altitude and bank tend to vary
- Describe stall recognition and the correct recovery sequence
- Explain ground reference maneuvers and the wind correction principle behind them
- Describe the engine failure after takeoff procedure and the impossible turn
- Explain when and how to execute a go-around decisively
Lesson 1 — Understanding the ACS Standards
The Airman Certification Standards (ACS) replaced the Practical Test Standards (PTS) in 2016. The ACS defines exactly what the DPE is evaluating — not just maneuver procedures but also knowledge and risk management. Understanding the ACS before your checkride is essential: it is the standard you will be held to, and it is publicly available on the FAA website. See our full PPL maneuvers guide →
Every maneuver has three components in the ACS: Knowledge (what you must know about the maneuver, tested in the oral), Risk Management (what hazards you must recognize and manage), and Skills (the specific tolerances you must maintain in flight). The DPE evaluates all three simultaneously — a technically perfect maneuver executed without situational awareness can still be unsatisfactory.
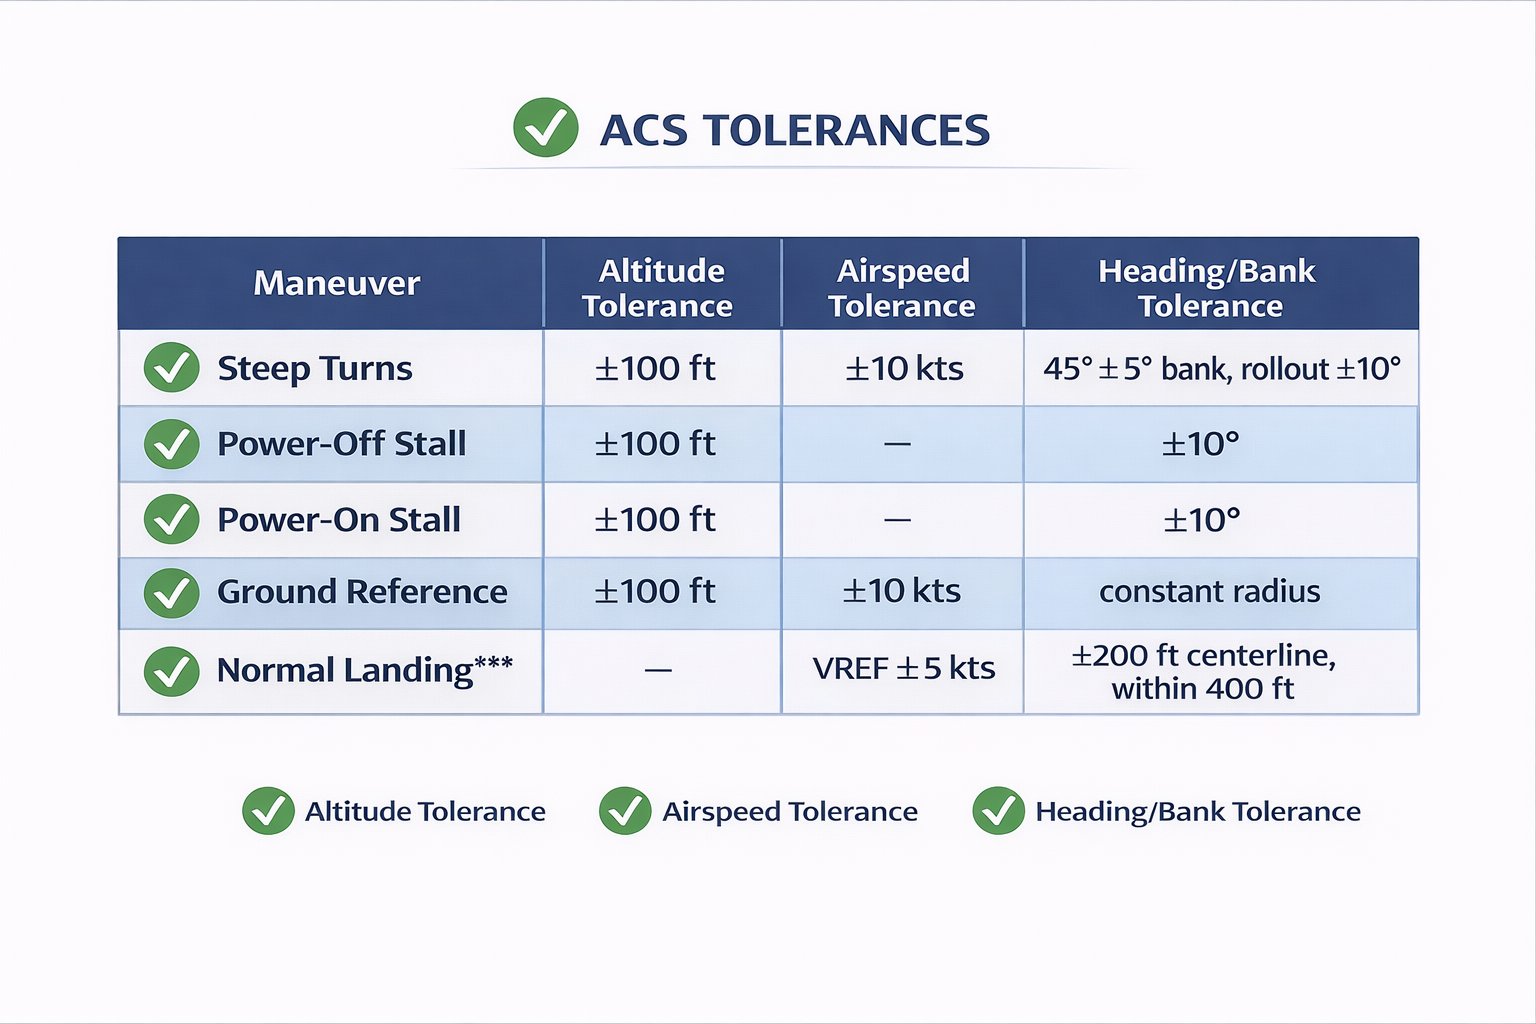
| Maneuver | Altitude | Airspeed | Heading/Bank | Other |
|---|---|---|---|---|
| Steep Turns | ±100 ft | ±10 kts | 45° bank ±5°; rollout ±10° | Smooth coordination throughout |
| Slow Flight | ±100 ft | +10/−0 kts of MCA | ±10° | Coordinated; stall warning may activate |
| Power-Off Stall | ±100 ft of entry | — | ±10° at recovery | No secondary stall; coordinated recovery |
| Power-On Stall | ±100 ft of entry | — | ±10° at recovery | Right rudder critical; no secondary stall |
| Ground Reference | ±100 ft | ±10 kts | Constant radius (visual) | Coordinated; proper wind correction |
| Normal Landing | — | VREF ±5 kts | Centerline ±200 ft | Touch down within 400 ft of aim point |
| Short-Field Landing | — | VREF ±5 kts | Centerline | Touch down within 200 ft of aim point |
What the ACS actually evaluates — the three-column approach
The ACS evaluates every task area in three dimensions. Understanding this changes how you prepare:
Knowledge (K): Can you explain the task — what it is, why it's performed, what the risks are, and what the regulatory basis is? DPEs assess knowledge in the oral exam. If you can't explain why you're doing a maneuver, you're not ready to do it on a checkride.
Risk Management (R): Can you identify and mitigate the risks associated with the task? For every maneuver, there are associated hazards — the spin entry in a stall, the potential for runway excursion in a short-field landing, the terrain risk in a go-around. ACS risk management items are tested in both oral and flight portions.
Skills (S): Can you execute the maneuver within the published tolerances? This is the traditional checkride component — altitude within ±100 feet, heading within ±10 degrees, airspeed within ±10 knots. These are minimums, not targets — the best candidates consistently do better.
What DPEs are really watching throughout the flight
Beyond maneuver tolerances, DPEs are continuously evaluating five broader competencies:
- Positive aircraft control: Are you always in command of the aircraft? Are your inputs purposeful, or reactive and chasing?
- Situational awareness: Do you know where you are, what the weather is doing, and what other traffic is around you — or are you so task-saturated by the maneuver that the big picture disappears?
- Checklist use: Do you actually use the checklists, or do you memorize and skip? DPEs look for proper checklist discipline, especially during abnormal procedures.
- ATC communication: Are your radio calls professional, accurate, and at the right times?
- Decision making: Do you make safe, sound decisions — or do you press on with a bad approach rather than going around?
A common misunderstanding: you can fail specific maneuver tolerances on individual tasks and still pass the checkride if the DPE sees overall competence and sound judgment. Conversely, consistently average performance combined with poor decision making can result in a failure even without a single "failed" maneuver. The checkride assesses the whole pilot, not a list of individual trick shots.
Lesson 2 — Normal Takeoff and Climb
The normal takeoff is the foundation from which all other takeoff types build. The goal is a smooth, coordinated departure that transitions from a ground roll to an established climb in a controlled, predictable manner.
Procedure, step by step
Pre-takeoff: Complete the checklist. Verify runway clear, wind favoring the runway in use. Set trim for takeoff. Flaps per POH (many trainers use no flaps for normal takeoff). Transponder to ALT. Set heading indicator to runway heading as a reference.
Line up: Turn onto centerline, pause to let heading indicator settle. Note the runway heading on the DI — you'll use it as a reference during the roll. Apply smooth, full throttle. Check engine instruments (green within 3–5 seconds). Keep feet light on the rudder — use it to track centerline, not the brakes.
Rotation: At Vr (rotation speed per POH — typically 55–65 kts for most trainers), apply smooth back pressure to establish the takeoff attitude. Don't jerk the yoke — raise the nose smoothly to the climb attitude. The aircraft will fly off.
Initial climb: Establish Vy (best rate of climb) — typically 73–79 kts for a Cessna 172. Apply right rudder to counteract left-turning tendencies at full power. Retract flaps in stages per POH after a positive rate of climb is established. Maintain runway heading until above 400 ft AGL (obstacle clearance standard) then turn on course.
Critical speeds to memorize for your aircraft: Vr (rotation), Vx (best angle — obstacle clearance), Vy (best rate — normal climb), Vfe (max flap extension), Va (maneuvering speed), Vno (max structural cruise), Vne (never exceed). These will be asked in the oral exam. Know them for your specific aircraft — not for a generic trainer.
The takeoff roll — what's happening under your feet and hands
The takeoff roll is one of the highest-workload phases of flight, despite lasting only 15–25 seconds. Here's what you're managing simultaneously:
Directional control with rudder: As the propeller begins spinning at full power, P-factor, torque, and slipstream all yaw the aircraft left. Right rudder — applied progressively from the start of the roll — keeps the nose on centerline. As airspeed builds and aerodynamic rudder effectiveness increases, the required rudder pressure decreases. Student pilots who apply the right rudder late end up tracking left of centerline; those who apply too much track right.
Back pressure timing on rotation: At Vr (rotation speed), smoothly apply back pressure to raise the nose to the takeoff pitch attitude (approximately 10–12° above the horizon in most trainers). This is not a yank — it's a smooth, deliberate rotation. Too much back pressure too fast can cause an abrupt nose rise that momentarily reduces lift; too little leaves the aircraft on the ground past Vr, consuming runway.
Wind correction: Any crosswind component will try to weathervane the nose into the wind on the ground. Additional rudder holds the centerline. After liftoff, aileron into the wind (wing down on the upwind side) plus rudder correction maintains the ground track.
Vx vs. Vy — when to use each and why
Vx (Best Angle of Climb): The airspeed that gives the greatest altitude gain per unit of horizontal distance. Use when there's an obstacle — trees at the end of a short runway, rising terrain ahead. Vx provides the steepest climb angle. The tradeoff: the nose is high, forward visibility is reduced, and the engine runs hotter (less cooling airflow). Once clear of the obstacle, accelerate to Vy immediately.
Vy (Best Rate of Climb): The airspeed that gives the greatest altitude gain per unit of time. Use for normal climbs to cruise altitude when no obstacle is present. Vy provides the fastest altitude gain in feet per minute. The nose attitude is lower than Vx — better visibility and better engine cooling. Most post-takeoff climbs use Vy once obstacle clearance is achieved.
Both Vx and Vy decrease as altitude increases — the performance gap between thrust and drag narrows with altitude. Vx and Vy converge at the aircraft's absolute ceiling where climb rate reaches zero. In a C172, Vx is approximately 62 KIAS and Vy is approximately 74 KIAS at sea level.
What to do if the engine quits on takeoff
Engine failure immediately after takeoff is the most time-critical emergency in aviation. You have very little altitude, very little airspeed, and very little time. The rule that saves lives: do not turn back to the runway below 1,000 feet AGL.
The temptation to turn back — called the "impossible turn" — is nearly always fatal at low altitude. The turn requires bank angle that increases stall speed, at slow airspeed, at low altitude, with degraded power. The math is unforgiving: most training aircraft cannot complete the turn and land safely from below 1,000 AGL. Instead: lower the nose immediately to best glide, pick the best available option straight ahead or within a shallow turn angle (30° maximum), and land as controlled as possible. A gear-up landing on a field straight ahead is far more survivable than a stall-spin on the turnback.
Lesson 3 — Normal Approach and Landing
Consistent landings come from consistent approaches. The DPE is not just evaluating the touchdown — they are evaluating your energy management from the moment you enter the pattern. An unstabilized approach almost always produces a poor landing.
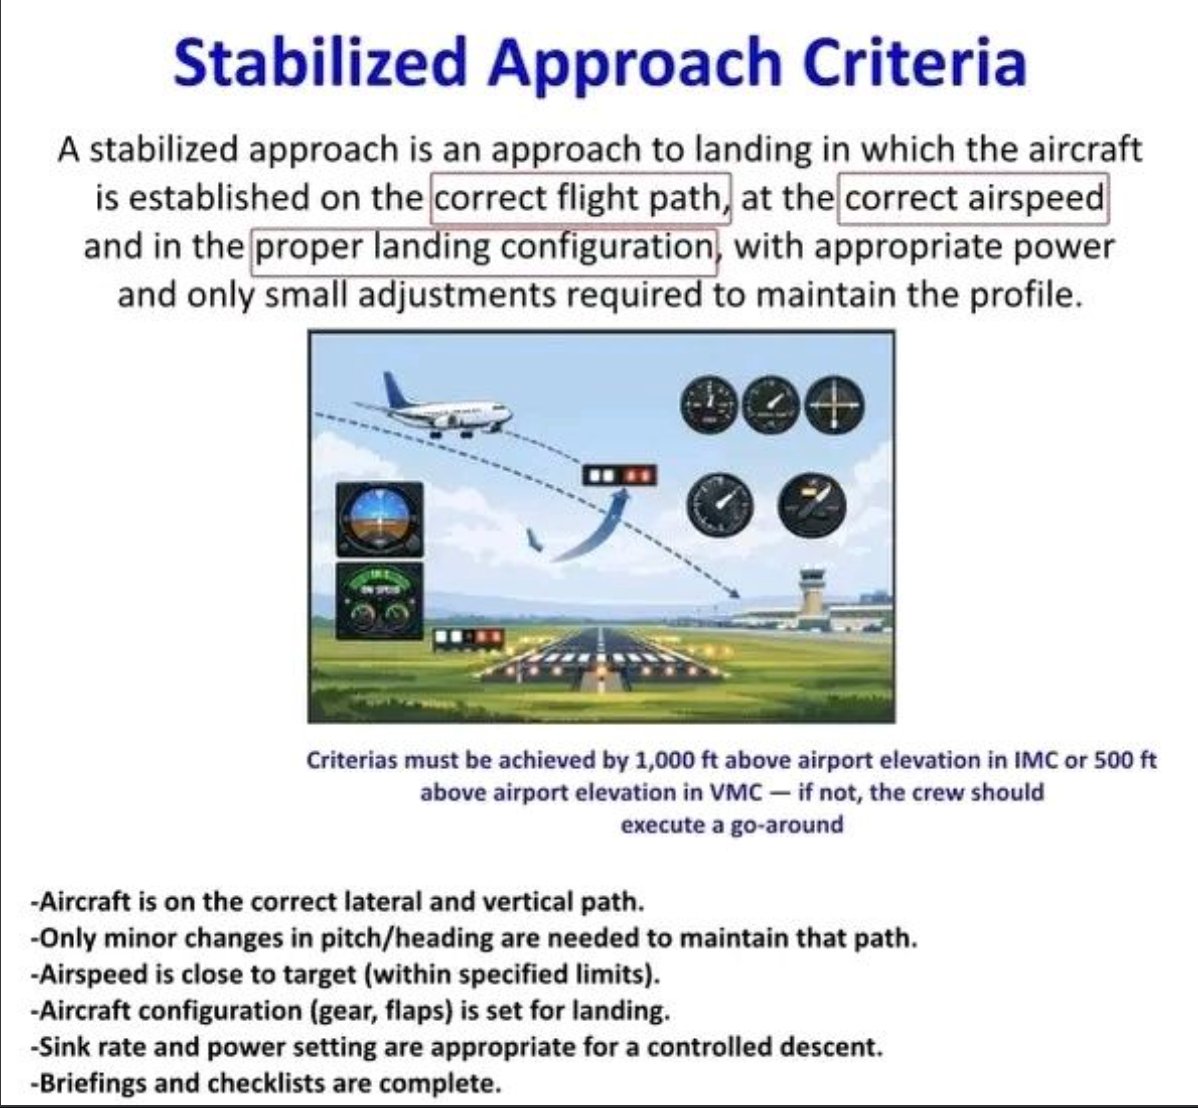
The stabilized approach concept
A stabilized approach means that by 500 ft AGL, you have established and are maintaining: the correct approach speed (VREF, typically 1.3 × Vso), the correct descent rate (typically 400–600 fpm in the approach configuration), the correct configuration (flaps per POH), and alignment with the runway centerline. If any of these is not established by 500 ft AGL, go around. This is not a suggestion — it is the professional standard.
The aiming point technique
Select a specific point on the runway — typically the first third — as your aiming point. Keep it stationary in the windshield. If the aiming point moves down in your windshield (appears to move toward the bottom of the glass), you are overshooting — the point is getting closer. Add back pressure and reduce power. If the aiming point moves up, you are undershooting — add power.
A stationary aiming point in the windshield means you are on a constant glidepath to that point. Move the point down = you'll fly over it. Move it up = you'll land short.
The flare and touchdown
Crossing the runway threshold, begin a gradual reduction in power toward idle and a simultaneous gentle nose-up pitch to arrest the descent. The flare converts the airplane's energy from descent to forward motion. The goal: touch down on the main gear in a slightly nose-high attitude at minimum controllable airspeed, with the stall warning activating near touchdown in a well-executed landing. After main gear touchdown, hold the nose off as long as practical, then lower gently. Maintain directional control through the rollout with rudder — not brakes.
Common student errors on landing:
Flaring too early — aircraft floats far down the runway. Cause: rounding out above normal flare height. Fix: be patient, wait to feel the ground effect.
Ballooning — nose pitches too high during flare, aircraft climbs back up. Cause: too much back pressure too fast. Fix: smooth, gradual back pressure. If balloon occurs, add power and go around.
Diving at the runway — not flaring at all. Cause: fixation on the far end of the runway instead of peripheral vision of the near runway edge. Fix: develop the visual scan.
Energy management — the real skill in consistent landings
Landing is fundamentally an energy management problem. You start the approach with too much altitude and airspeed — potential and kinetic energy — and your job is to convert exactly the right amount of both into a smooth touchdown on the first third of the runway. Too much energy: you float past your touchdown point. Too little: you land short or hit hard. Consistent landings come from consistent energy management throughout the approach, not from a perfect flare at the last moment.
The stabilized approach concept addresses this directly: if the approach isn't right by 500 feet AGL, go around. A stabilized approach has four components: (1) on centerline, (2) on glidepath (PAPI showing 2 white/2 red or normal visual references), (3) at target approach speed (Vapp = 1.3 Vso in a C172, approximately 65 KIAS), (4) in final configuration (flaps as planned, gear down if retractable). Any deviation from all four of these below 500 AGL means go around.
The flare — exactly what's happening and how to do it
The flare is the transition from the descent attitude to the landing attitude. As you cross the runway threshold at approximately 50 feet AGL, begin a gradual reduction in descent rate by smoothly raising the nose. You're simultaneously reducing power to idle (if not already done) and raising the nose to arrest the descent. The timing and rate of the flare are what separate smooth landings from hard ones.
Too early: Flare begins at 100+ feet — the descent rate is arrested but airspeed bleeds off before you reach the runway. The aircraft settles from too high and touches down hard. Or worse: you have to add power to prevent a hard landing, which is fine, but if you add too much, the aircraft balloons back into the air.
Too late: Flare begins at 10 feet — the descent rate is barely arrested before the wheels touch. Hard landing, potentially bounced landing.
Correct: Flare begins smoothly at approximately 20–30 feet AGL (varies by aircraft). The nose rises gradually. The descent rate decreases progressively. Airspeed bleeds off as the nose rises. The main wheels touch gently as the aircraft reaches the minimum flying speed in the ground effect zone. Then the nose wheel is lowered gently to the runway.
Crosswind landings — the two techniques and when to use each
Side slip (wing-down) technique: Bank into the wind with aileron while using opposite rudder to keep the nose aligned with the runway centerline. The upwind main wheel touches first, then the downwind wheel, then the nose wheel. This is the preferred technique for most light aircraft — it's intuitive, works well at all crosswind strengths, and maintains runway alignment throughout the flare.
Crab (de-crab) technique: Maintain a crab angle (nose pointed into the wind) throughout the approach to track the centerline. Just before touchdown, apply rudder to align the nose with the runway. The risk: if the de-crab is late, the aircraft touches down while crabbed — side loading the landing gear. Use this technique primarily when crosswind components are very high and a slip would be uncomfortable to maintain.
After touchdown in any crosswind: hold full aileron into the wind throughout the rollout. The wind will try to lift the upwind wing — full aileron prevents that. As airspeed decreases and aileron effectiveness decreases, the full deflection becomes necessary to maintain the same effect.
Lesson 4 — Short-Field and Soft-Field Techniques
Short-field takeoff
Short-field technique is used when runway length is limiting — you need maximum performance from the available pavement. The technique differs from normal in two key ways: you hold the brakes at full power before releasing (extracting full power before starting the roll), and you climb at Vx (best angle, not Vy) to clear any obstacle at the departure end.
Procedure: Position on the very beginning of the runway (use all available runway). Hold brakes. Apply full power. Verify full power and check instruments. Release brakes. At Vr, apply back pressure to rotate. Establish Vx attitude and climb. Once obstacles are cleared, lower nose to Vy. ACS tolerance: touch down within 200 ft of the specified point.
Vx vs Vy — why it matters:
Vx (best angle) gives you the most altitude gained per unit of horizontal distance. If there's a 50 ft obstacle 300 ft past the end of a short runway, you need altitude over distance — Vx.
Vy (best rate) gives you the most altitude gained per unit of time. For cruise climb after obstacles are cleared, Vy gives you altitude faster with better engine cooling.
Short-field departure: Vx from liftoff to obstacle clearance, then Vy. Normal departure: Vy from liftoff throughout.
Short-field landing
Aim for the very threshold — the landing zone markers. Maintain a steeper than normal approach using full flaps and a precise VREF airspeed. Touch down on the main gear at minimum airspeed as close to the threshold as possible. After touchdown: apply full braking, hold nose up to use aerodynamic braking, then lower nose gently as speed decreases.
Soft-field takeoff
Soft-field technique minimizes the time the aircraft spends with weight on a soft or uneven surface — grass, gravel, unpaved strips. The principle: get the wings generating lift as early as possible to relieve the wheels of the aircraft's weight, reducing drag and preventing bogging down.
Key technique: Never stop on a soft surface — maintain rolling momentum throughout. Apply full back elevator as you begin the roll (transferring weight to wings). The aircraft will lift off at a lower than normal speed — this is intentional. Once airborne, lower the nose slightly to remain in ground effect and accelerate to Vx or Vy before climbing away from the surface.
Soft-field landing
The goal is the gentlest possible touchdown — minimum vertical velocity at the moment of wheel contact. Full flaps for maximum lift at minimum speed. Carry some power through the flare — more than a normal landing — to achieve minimum sink rate at touchdown. Do not go to idle as in a normal landing; carry power until the main wheels touch. Touch down with minimal sink rate. After touchdown, hold the nose up as long as possible to prevent the nose gear from digging into the soft surface. Avoid braking — let the surface itself slow the aircraft.
Short-field technique in depth — the precision required
Short-field takeoff requires maximum performance from every inch of runway. Three things make it different from normal:
- Maximum power before brake release: Hold the brakes at full power (1–3 seconds) to allow the engine to reach full RPM before the roll begins. This produces maximum thrust from the first foot of runway. Never apply brakes so hard that the aircraft rocks — just hold position while power stabilizes.
- Rotation at Vr to Vx: Lift off at the recommended rotation speed and immediately establish the Vx pitch attitude. Vx gives the steepest climb angle — maximum altitude gain over the obstacle at the departure end.
- Accelerate to Vy after obstacle clearance: Once the obstacle (or its imaginary equivalent at the pattern altitude) is cleared, lower the nose to Vy and climb normally. Holding Vx unnecessarily is hard on the engine and reduces forward visibility.
Soft-field technique — the physics of turf and unprepared surfaces
Soft-field technique is used on grass, gravel, dirt, or any surface where wheel drag is significantly higher than on paved runway. The goal is to get the weight off the main wheels as quickly as possible to reduce rolling resistance — while remaining in ground effect until adequate flying speed is reached.
Soft-field takeoff: Apply full back pressure as you roll onto the runway (don't stop — keep rolling to prevent bogging down in soft spots). The nose wheel lifts immediately at low speed. As power is applied, the aircraft lifts off before normal rotation speed. Remain in ground effect (no more than one wingspan above the surface) and accelerate to Vx or Vy before climbing. This is the "wheelie" technique — you're flying while still effectively at takeoff roll speed, using ground effect to help.
Soft-field landing: Carry slightly more power through the flare to hold the nose wheel off as long as possible. Touch down main wheels first at minimum speed. After touchdown, hold full back pressure to keep weight off the nose wheel as long as possible while decelerating. Taxi off at minimum speed.
The most common soft-field mistake: climbing too aggressively after liftoff before reaching Vy, leaving ground effect prematurely. The aircraft "mushes" — barely flying, high drag, unable to climb effectively. Stay in ground effect and accelerate first.
Short-field landing — hitting the numbers
Short-field landing is about crossing the threshold at Vref (typically 1.3 Vso = approximately 61 KIAS in a C172) at the threshold height (50 feet or lower) and touching down within 200 feet of the designated point. The technique:
- Fly a normal approach but aim for the threshold rather than the touchdown zone — you want to use minimal runway after the threshold.
- Cross the threshold at Vref — not 5 knots faster "for safety." Each additional knot adds approximately 15–20 feet of float before touchdown.
- Apply firm braking after touchdown — don't wait for rollout to begin braking. Maximum braking (short of locking the wheels) begins immediately after touchdown.
- Retract flaps after touchdown — this transfers more weight to the wheels, increasing braking effectiveness (aerodynamic lift subtracted from weight on wheels).
Lesson 5 — Steep Turns
The steep turn (45° bank, at least 360°) is the checkride maneuver that most directly tests whether you can maintain precise aircraft control under increased load factor. It appears simple but requires constant, coordinated corrections to hold all parameters within ACS tolerance simultaneously.
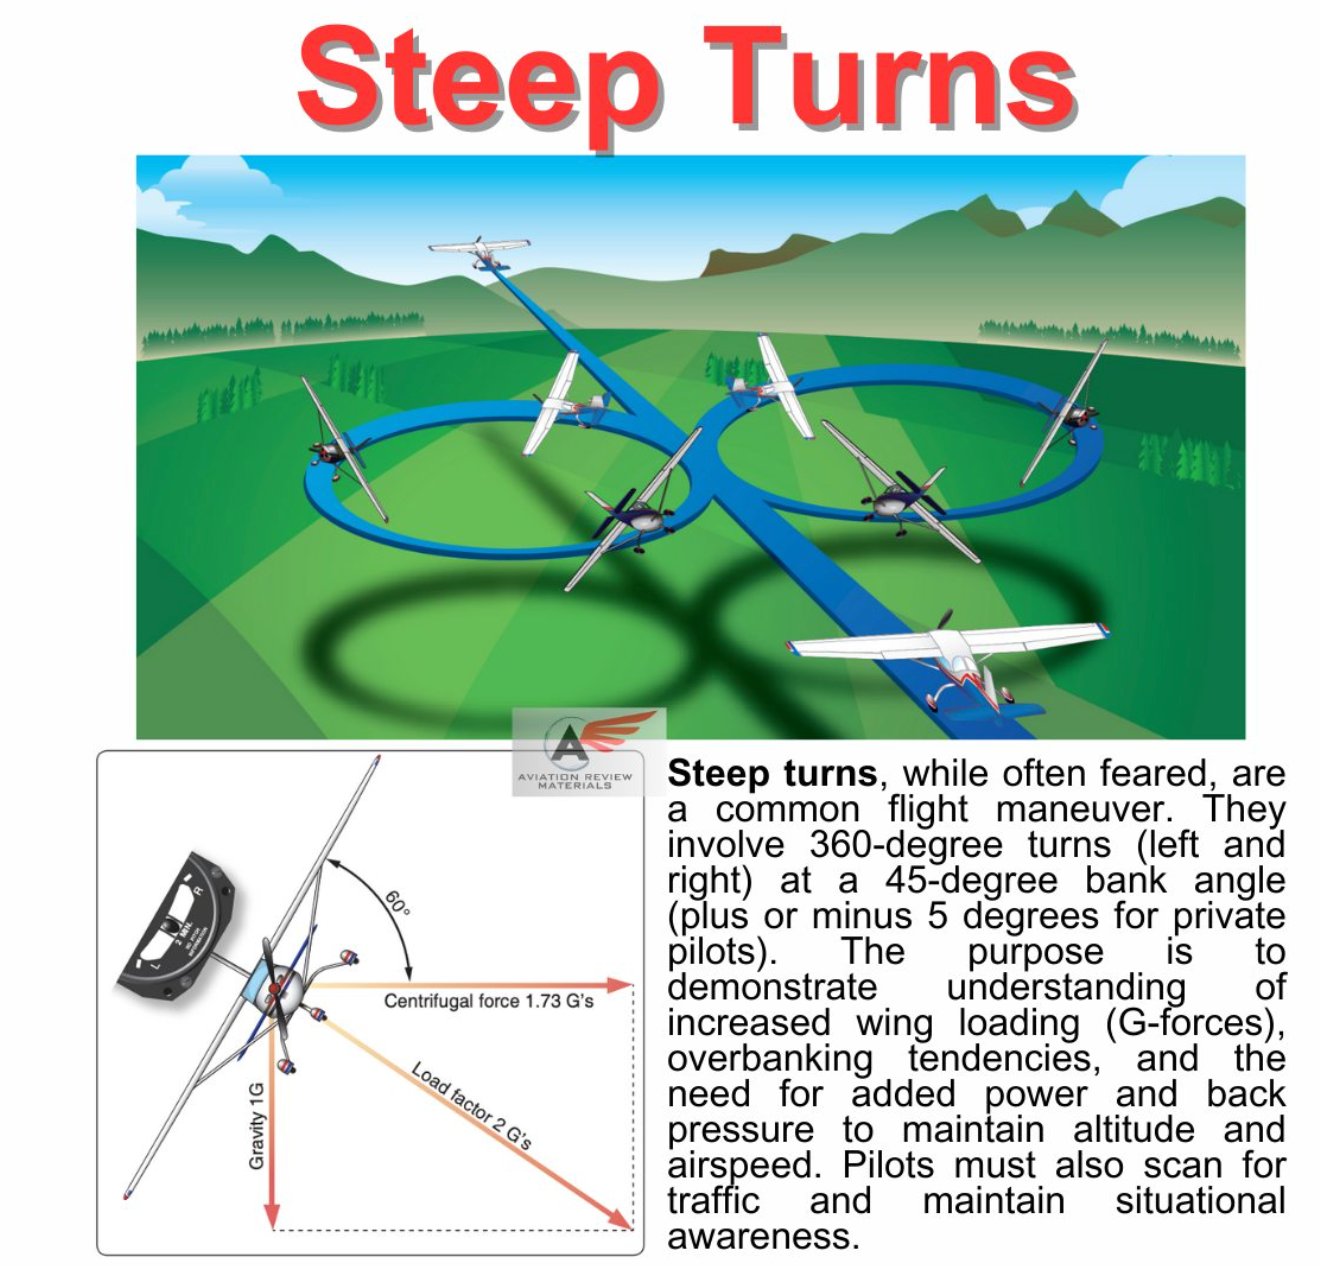
Why altitude tends to drop in a steep turn
As bank angle increases toward 45°, load factor increases to 1.41G. The wings must generate 41% more lift to maintain level flight. More lift requires either more angle of attack or more speed — in a coordinated bank, you provide back pressure to increase AOA. If you don't add enough back pressure, altitude bleeds off. If you add too much, you climb. Finding and holding the exact back pressure is the skill.
Additionally, as lift increases to support the load, induced drag increases — the aircraft wants to slow down. Adding power (typically 75–200 RPM or 1–2 inches MAP) helps maintain airspeed and aids in altitude maintenance. The entry and exit are the most demanding moments — the rapid change in bank requires coordinated adjustment of back pressure and power simultaneously.
Procedure
Setup: At Va or below. Clear the area (two 90° clearing turns). Select a prominent reference point on the horizon or a specific compass heading. Establish cruise airspeed.
Entry: Smoothly roll to 45° bank. Simultaneously apply back pressure to maintain altitude and add power to maintain airspeed. Establish the correct bank, back pressure, and power before the first 90° of turn.
During the turn: Keep the bank precisely at 45° — don't let it creep. Cross-check: bank angle, altitude, airspeed, coordination (ball). Adjust back pressure as needed to hold altitude within ±100 ft.
Rollout: Lead the rollout by approximately half the bank angle — about 20–25° before the target heading. Roll out smoothly, simultaneously reducing back pressure and power to cruise settings. A rushed or late rollout produces heading errors and altitude deviations.
Why steep turns are hard — the physics that work against you
At 45° of bank, load factor is 1.41 G. The lift equation tells us that to maintain altitude, total lift must increase by 41%. The only way to increase lift at the same airspeed is to increase angle of attack — which means more back pressure. If you don't add back pressure continuously as the bank increases, the aircraft descends. If you add too much, it climbs. The back pressure requirement is not constant — it increases as bank deepens.
Overbanking tendency: in a steep turn, the outer (faster-moving) wing produces more lift than the inner wing, tending to steepen the bank automatically. Without correction, the bank increases past 45° to 50° or 60°, increasing load factor further and tightening the spiral. You must consciously hold the bank at 45° with slight opposite aileron throughout.
Executing steep turns to ACS standards
ACS requires: bank 45° ± 5°, altitude ±100 feet, rollout on entry heading ±10°, airspeed ±10 knots. Here's how to hit those tolerances consistently:
Entry: At the desired altitude and airspeed (Maneuvering Speed or below, typically 95 KIAS in C172), smoothly roll to 45° bank while simultaneously adding back pressure. As the bank reaches 45°, the back pressure requirement becomes clear — you'll feel it in the yoke. Add a small amount of power (100–200 RPM) to compensate for increased drag.
Maintaining the turn: Divide attention between the attitude indicator (bank angle) and outside (altitude, horizon reference). Cross-check the altimeter frequently. If climbing — reduce back pressure slightly. If descending — add back pressure. The tendency is to chase the altitude aggressively — small, smooth corrections work better than large inputs.
Rollout: Begin rollout approximately 20° before the entry heading (because the aircraft continues turning during rollout). Reduce back pressure as bank decreases. Return to cruise power. Roll out wings-level on entry heading.
The 360° check: After completing the first 360°, you should be back at the entry altitude and heading. If you're 50 feet low and 15° off heading, you have two 90° arcs to correct before the rollout — make small adjustments, don't overcorrect.
Lesson 6 — Slow Flight and Stalls
Slow flight — minimum controllable airspeed
Slow flight is conducted at minimum controllable airspeed (MCA) — the slowest speed at which the aircraft remains controllable in straight-and-level flight with the stall warning possibly activating. It demonstrates aircraft control authority at the very slow speeds encountered in the approach and landing phases.
At MCA, the aircraft is flying at high angle of attack. Control response changes dramatically: ailerons are less effective (and cause more adverse yaw), elevator has less authority, and rudder becomes the primary control for heading. Students accustomed to cruise flight are surprised by how slowly the aircraft responds and how much right rudder is needed to prevent left-turning tendency at high AOA and partial power.
Stall recognition and recovery — the most safety-critical skill
A stall is the aerodynamic event where angle of attack exceeds the critical AOA and lift drops dramatically. Stall recognition means identifying the signs that a stall is approaching — before the break occurs — and taking corrective action:
- Stall warning horn: activates typically 5–10 kts above stall. This is your first warning.
- Buffet: turbulent airflow from the stalled wing root strikes the tail, creating a characteristic vibration in the controls.
- Pitch attitude: extremely nose-high in a power-off stall; this is the context clue before the warning activates.
- Sluggish controls: control response noticeably reduced — elevator and aileron inputs require more deflection for the same response.
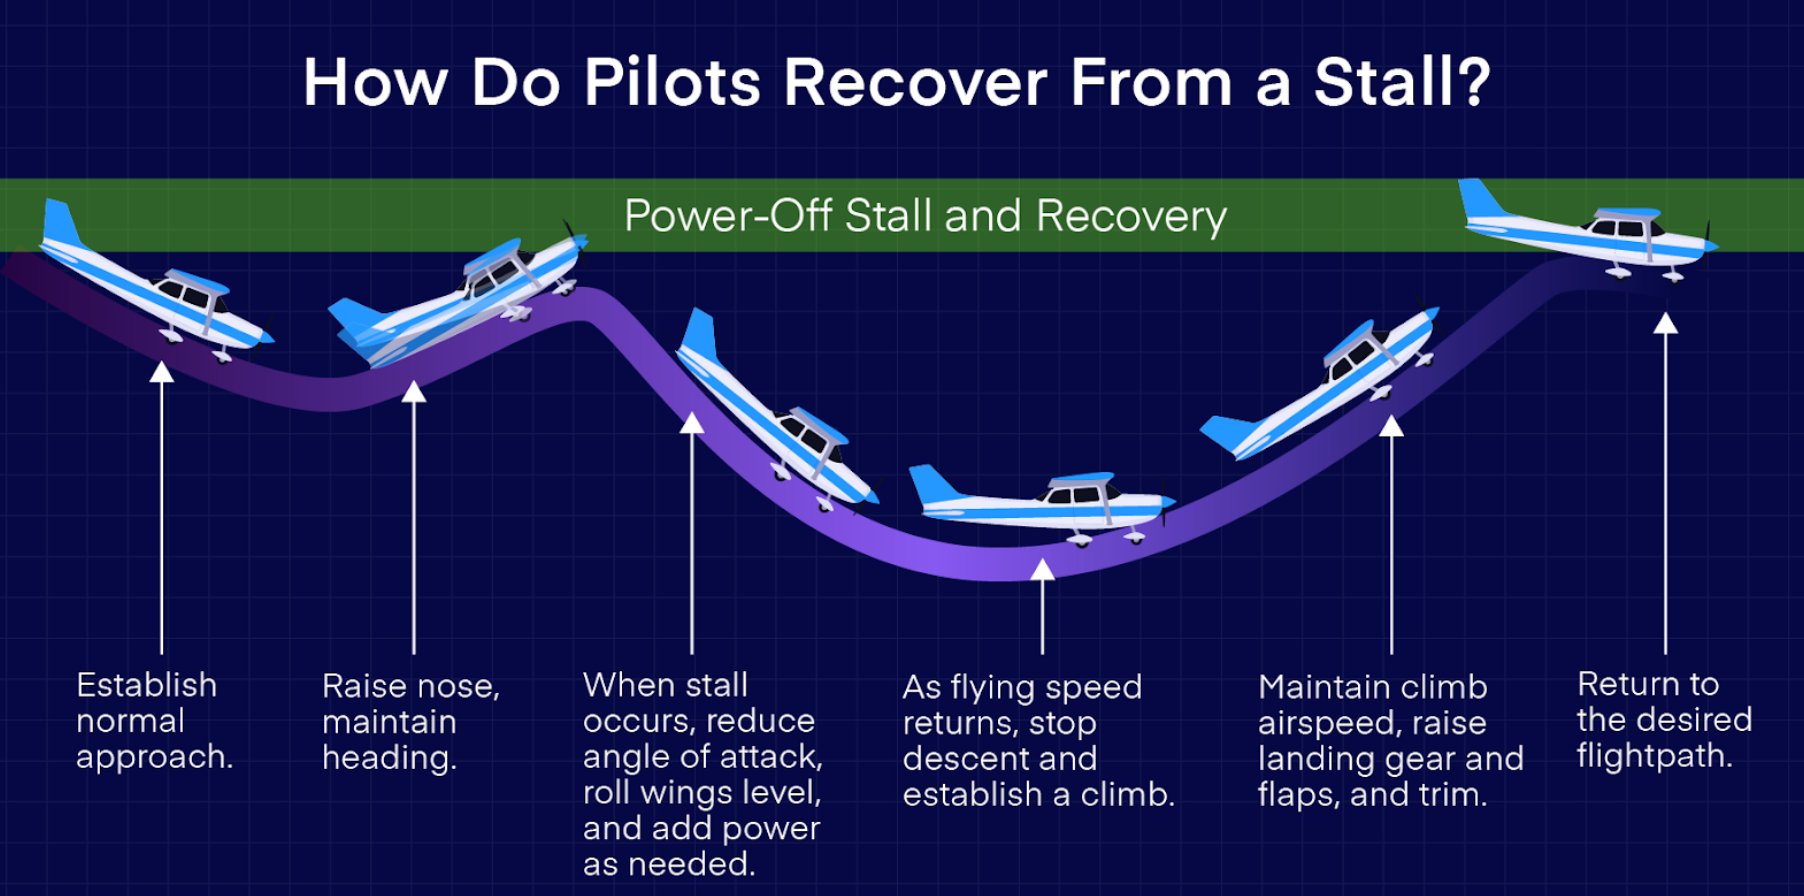
The stall recovery sequence — memorize this:
1. PITCH — simultaneously and immediately apply forward pressure to reduce angle of attack below the critical AOA. This is the only action that directly addresses the cause of the stall. Do not wait to apply power first.
2. POWER — simultaneously apply full throttle (or as much as needed). Power arrests the descent and provides energy for climb recovery.
3. RUDDER — coordinate with rudder to prevent yaw and maintain coordination. At full power, left-turning tendency is extreme — right rudder is critical.
4. FLAPS — retract flaps in stages as airspeed increases above Vfe. Never retract all at once — sudden lift loss at low altitude.
The sequence is: Pitch → Power → Coordinate → Flaps. Not Power → Pitch. Not all at once. Pitch first.
Power-on stall (departure configuration)
Simulates the departure stall — stalling during or shortly after takeoff at high power. Most dangerous close to the ground because recovery altitude is minimal. Setup: reduce power, establish climb attitude, then apply full power. Slow to stall at full power in climb attitude. Recovery: pitch forward (unload the wing), maintain full power, right rudder aggressively, retract flaps in stages.
Slow flight — what you're practicing and why it matters in the real world
Slow flight simulates the conditions just before landing — high angle of attack, low airspeed, degraded control effectiveness, close to stall. Every landing you make is preceded by a slow flight phase (the flare). Practicing slow flight at altitude builds the muscle memory and intuition needed to handle that phase confidently near the ground.
In slow flight, the control relationships change significantly from cruise. The aircraft operates behind the power curve — adding power increases airspeed and reduces descent rate, but adding back pressure without power increases angle of attack and may trigger a stall rather than climbing. The rudder is the most effective roll control in some configurations (adverse yaw from ailerons is pronounced at high AoA). Turns require significantly more bank angle correction than in cruise to maintain altitude. All of this is counterintuitive at first.
Power-off stall — departure stall or approach stall?
Power-off stalls simulate the approach-to-landing stall — the aircraft is configured for landing (flaps extended, power reduced) and the nose is pulled up beyond the critical angle of attack. This represents the scenario where a pilot on final approach adds excessive back pressure, perhaps to arrest a high descent rate, and stalls.
The recovery: simultaneously push forward on the yoke (reduce AoA) and add full power. In a clean aircraft (flaps up), the nose drop at stall break is gentle and recovery is straightforward. In landing configuration (full flaps), the stall break can be more abrupt and the recovery requires more coordinated response — pushing forward while applying power, then retracting flaps incrementally as airspeed builds.
Power-on stall — the departure scenario
Power-on stalls simulate the takeoff or go-around stall — the aircraft is at high power and low airspeed, and the nose is pulled up excessively. This scenario kills pilots during go-arounds when the pilot adds full power and simultaneously pulls back aggressively, not allowing the aircraft to accelerate through the high-drag, high-power configuration before rotating.
The power-on stall has a more dramatic stall break than the power-off stall. At high power, the left-turning tendencies (P-factor, torque) are pronounced and cause the aircraft to roll left at the stall break. Recovery: simultaneously push forward, add/maintain power, level the wings with coordinated rudder. The wing that stalls first is the one that needs the most lift restoration — don't let the roll develop into a spin entry.
Spin awareness — the private pilot requirement
Private pilot applicants must demonstrate spin awareness — they don't have to perform spins, but they must understand how they develop and how to recover. A spin develops from an uncoordinated stall: the aircraft stalls while in a skid or excessive rudder input, causing one wing to stall more deeply than the other, resulting in autorotation (one wing up, one wing down, rotating around the vertical axis while descending steeply).
Spin recovery (PARE): Power to idle, Ailerons neutral (don't use ailerons — they can worsen the spin), Rudder full opposite to the rotation direction, Elevator forward to break the stall. Hold until rotation stops, then recover from the resulting dive. Altitude is the critical variable — spins require altitude to recover. The reason stall/spin accidents are fatal near the airport: there is no altitude to apply the recovery procedure.
Lesson 7 — Ground Reference Maneuvers
Ground reference maneuvers — turns around a point, S-turns across a road, rectangular course — develop the skill of maintaining a desired ground track by varying bank angle to compensate for wind drift. This skill directly applies to every traffic pattern you'll ever fly.
The wind correction principle
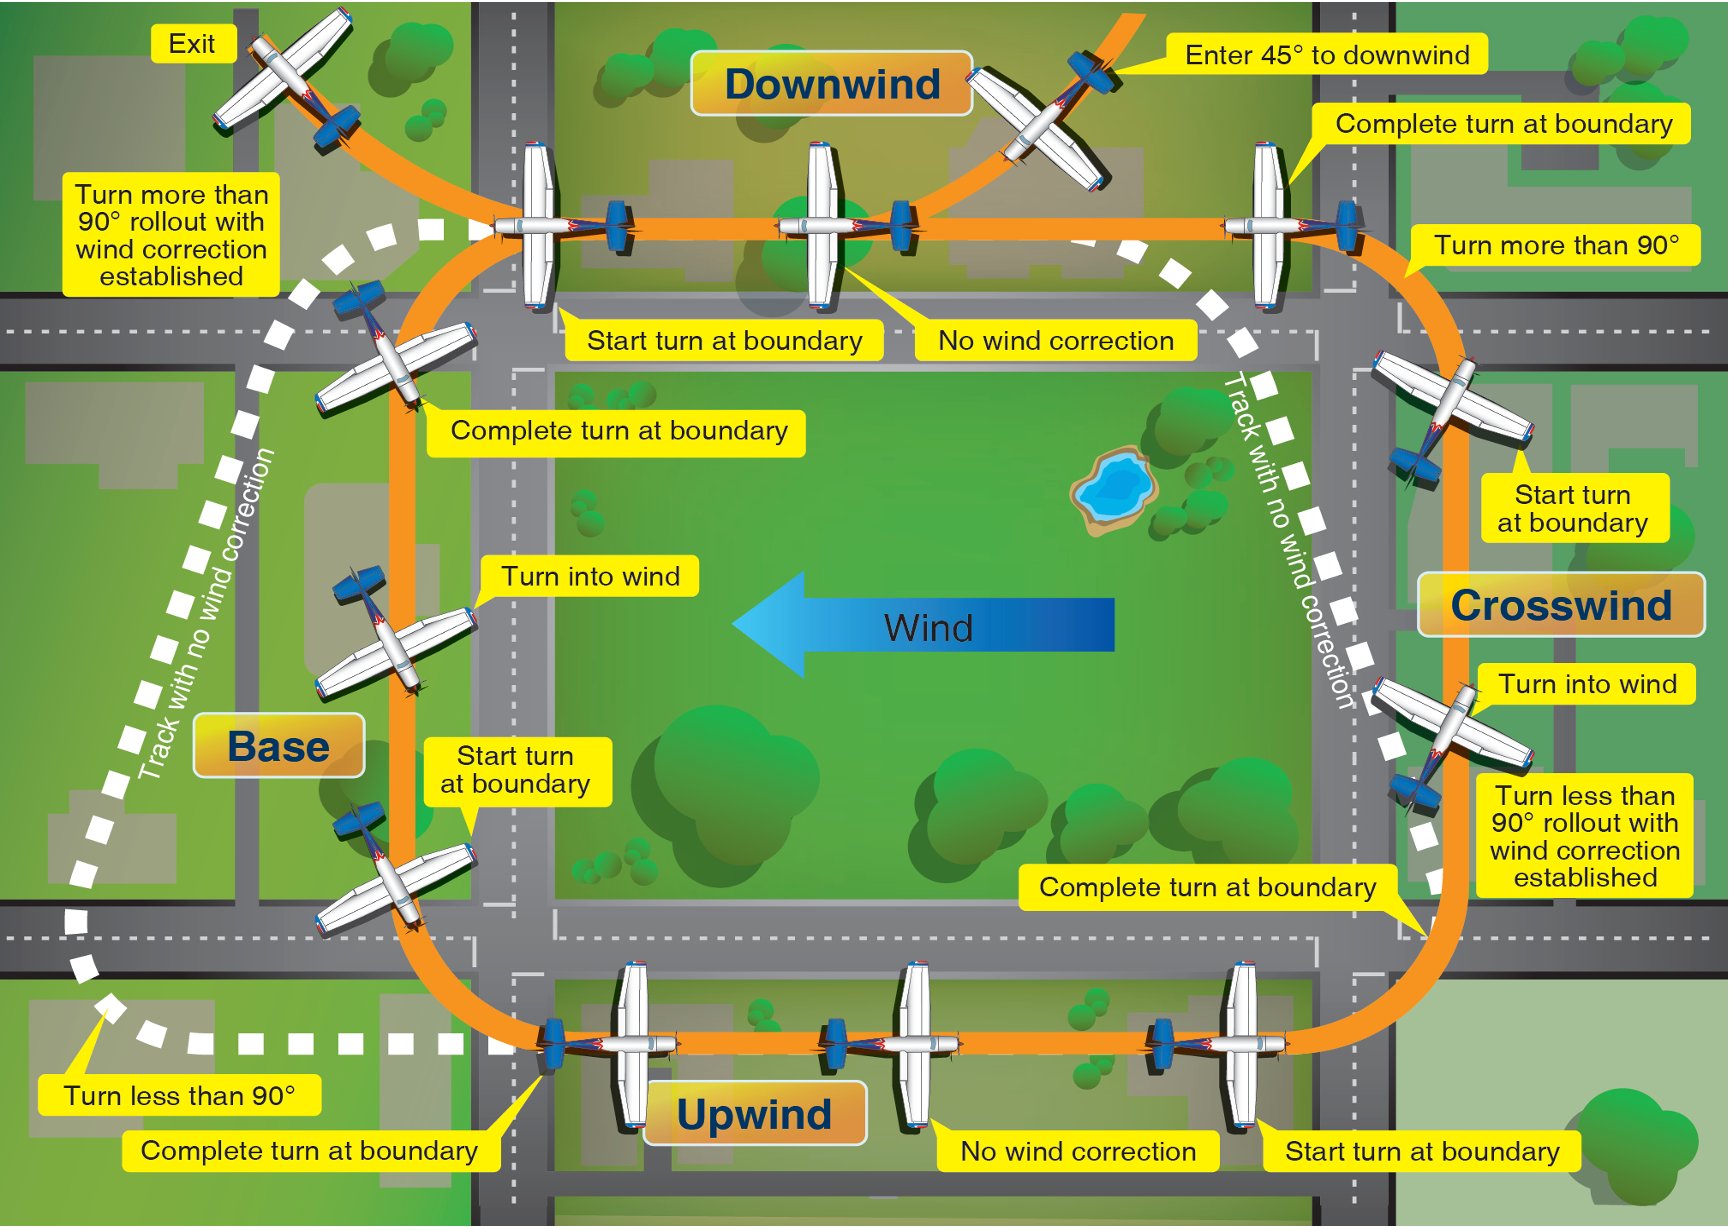
Groundspeed varies continuously as you turn in the presence of wind. On the downwind side of a circle around a point, your groundspeed is highest (wind adds to your airspeed over the ground) — you need the steepest bank to make the tightest turn and maintain the circle radius. On the upwind side, groundspeed is lowest — shallowest bank and widest turn to maintain the same radius.
Entry technique for turns around a point: Enter on the downwind side with 45-degree bank established. As you turn crosswind, the bank progressively decreases. By the upwind side, you are at your shallowest bank. Then progressively increase bank back to 45° as you return to the downwind side. The bank is constantly changing — never hold a fixed bank in a ground reference maneuver.
Traffic pattern connection: The rectangular course is literally a simplified traffic pattern. Each leg has a specific wind correction angle:
- Crosswind leg: crab into the wind to maintain a track perpendicular to the runway
- Downwind leg: slight upwind crab to track parallel to the runway
- Base leg: more aggressive crab as you turn toward the wind
- Final: crab to track aligned with runway centerline
Why ground reference maneuvers are on the checkride
Ground reference maneuvers develop two capabilities that directly apply to real flying: compensating for wind drift to maintain a desired ground track, and dividing attention between aircraft control and outside references. Both are required every time you fly a traffic pattern — which you do on every flight that includes a landing.
The core skill: as wind pushes the aircraft, you must bank more steeply on the downwind side of a circular maneuver (when the wind is pushing you away from the reference point, you need more bank to maintain the same radius) and bank more shallowly on the upwind side (when the wind is pushing you toward the reference point, less bank maintains the same radius). The bank angle varies continuously throughout the maneuver.
Turns around a point — execution
Select a prominent, isolated reference point on the ground (a road intersection, a lone tree, a prominent building corner). Entry is on the downwind side at approximately 600–1,000 feet AGL and bank angle that would be correct for no-wind conditions (typically 30°–45°). As the aircraft turns into the upwind portion, reduce bank to maintain the same radius against the wind. As the aircraft turns back to the downwind portion, increase bank.
The most common error: fixating on the reference point and losing track of altitude. Maintain altitude within ±100 feet throughout. Scan: reference point, attitude indicator, altimeter, reference point. The ACS requires the radius to remain constant — a pilot who maintains altitude and bank angle but drifts toward or away from the reference point hasn't mastered the maneuver.
S-turns across a road
S-turns use a straight road or linear feature as a reference. Cross the road wings-level at 90°, then immediately begin a coordinated turn (left or right) to trace a semicircle on one side of the road. Cross the road again wings-level, then immediately begin a turn in the opposite direction for a semicircle on the other side. The semicircles should be equal in radius — which requires varying bank angle for wind compensation.
Entry and rollout timing: the aircraft should be wings-level exactly as it crosses the road reference line. An early rollout means crossing with a bank; a late rollout means a missed crossing point. Timing improves with practice and by looking where the crossing will occur rather than at the road directly below.
Rectangular course — the traffic pattern connection
The rectangular course is flown around an imaginary rectangle on the ground — simulating an airport traffic pattern. Equal-length sides require the same wind correction principle: on downwind (wind pushing from behind), crab angle into the wind to track the straight segment; on crosswind turns, vary bank angle for wind; on base and final, correct for crosswind drift. The rectangular course makes the traffic pattern mechanics explicit and trainable outside the airport environment.
Lesson 8 — Engine Failure and Emergency Procedures
Engine failure after takeoff — the most critical emergency
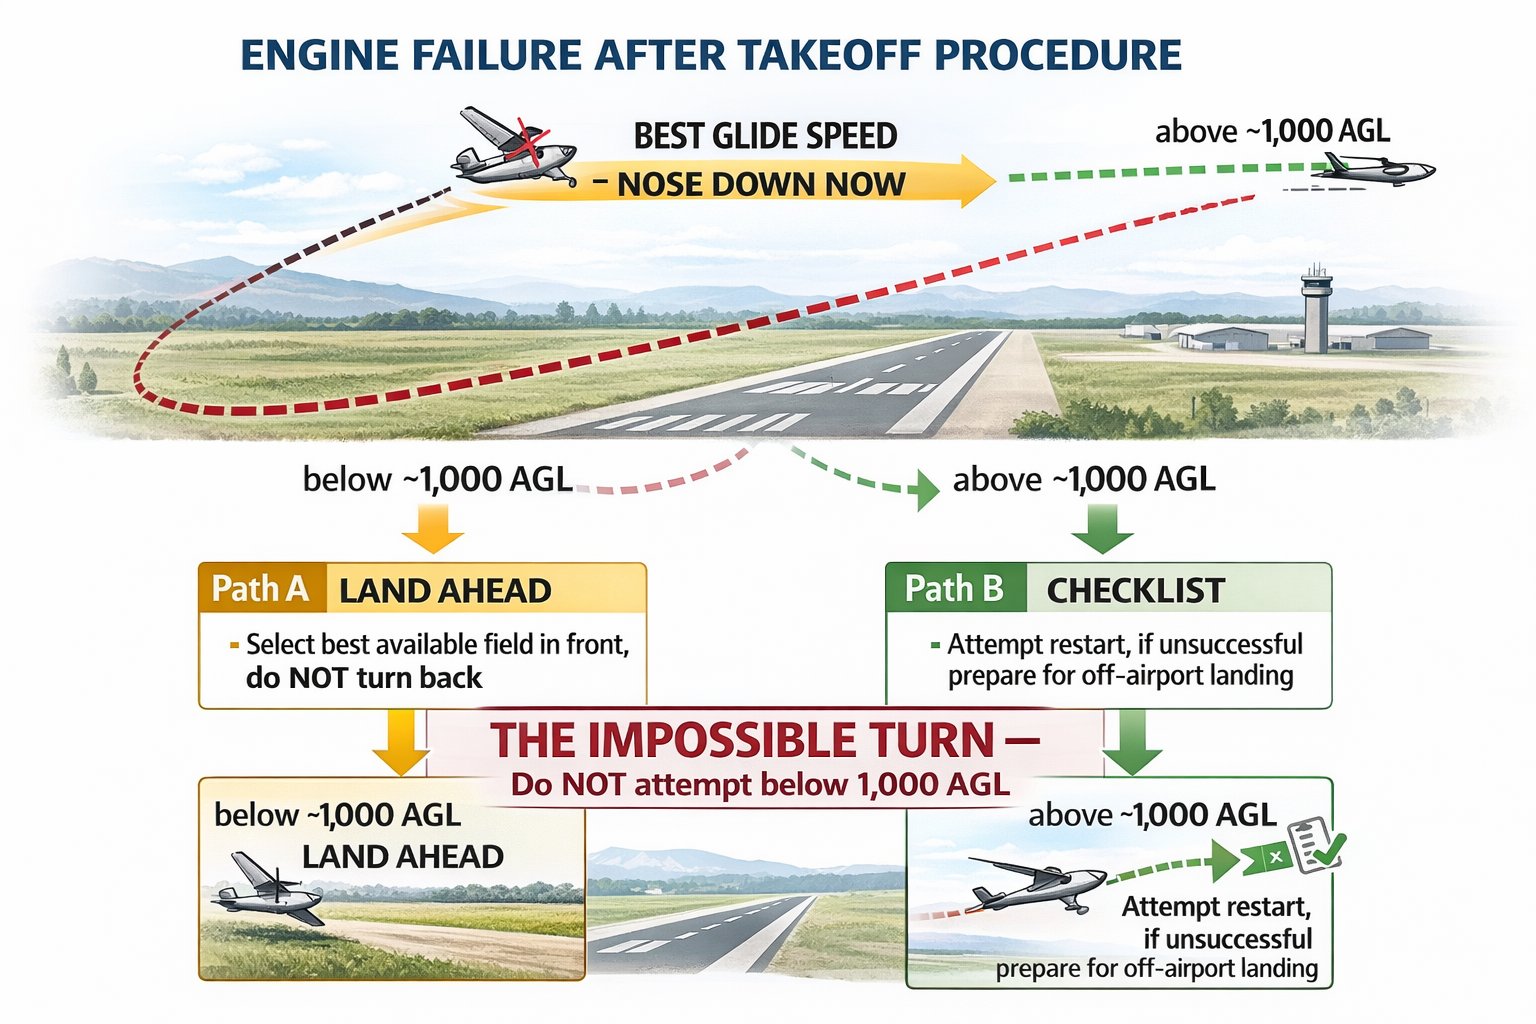
Engine failure immediately after takeoff gives you almost no time and very little altitude. Every second matters. The correct response is a memorized, automatic sequence — there is no time to think through the checklist.
2. IDENTIFY LANDING AREA — IN FRONT OF YOU — the best available field directly ahead.
3. CHECKLIST — fuel pump ON, fuel selector BOTH, mixture RICH, carb heat ON, ignition BOTH, primer IN AND LOCKED.
4. IF NO RESTART — fuel selector OFF, mixture IDLE CUTOFF, ignition OFF, master OFF before touchdown.
5. DECLARE EMERGENCY — MAYDAY, squawk 7700, advise ATC.
The impossible turn: Attempting to turn back to the runway after engine failure below approximately 1,000 ft AGL has killed hundreds of pilots. The math: you lose altitude in the turn. You lose altitude in the descent to the runway. Any imprecision makes it worse. Below 1,000 ft AGL, there is not enough altitude for most light aircraft to complete a 180° turn, align with the runway, and land. Accept the field in front of you — even a farmer's field, a road, or a parking lot is survivable. A stalled aircraft at 50 ft AGL is not.
The go-around — a professional decision
The go-around is one of the most important maneuvers in aviation — not because it is technically difficult, but because making the correct decision to execute one requires overcoming the human desire to "save" a bad approach. DPEs respect pilots who initiate timely go-arounds. They do not respect pilots who "squeeze it in" from an obviously unsafe position.
Initiate a go-around whenever: The approach is unstabilized below 500 ft AGL. The runway is occupied by another aircraft, vehicle, or person. You will not be able to touch down in the first third of the runway. You have any doubt about safely completing the landing. The DPE says "go around."
Go-around procedure: Full power immediately. Establish a positive-rate climb attitude. Carburetor heat OFF (if on). Retract flaps in stages per POH — not all at once. Track runway centerline. Climb to pattern altitude. Advise ATC or announce on CTAF. Fly a complete pattern to the next approach.
- ACS defines knowledge, risk management, and skill tolerances for every checkride maneuver — know the specific numbers.
- Normal takeoff: smooth full power, track centerline, rotate at Vr, establish Vy, retract flaps per POH, right rudder for P-factor.
- Stabilized approach: airspeed + descent rate + configuration + alignment all established by 500 ft AGL. If not — go around.
- Short-field: hold brakes at full power, Vx climb for obstacles, Vy after. Landing within 200 ft of aim point.
- Soft-field: continuous roll, full back elevator, liftoff early into ground effect, accelerate to Vy. Gentle landing, hold nose up.
- Steep turns: 45° bank ±5°, altitude ±100 ft, airspeed ±10 kts. Add power and back pressure on entry. Lead rollout 20–25°.
- Stall recovery sequence: PITCH first (reduce AOA) → POWER → COORDINATE (right rudder) → FLAPS in stages. Never power before pitch.
- Ground reference maneuvers: steepest bank downwind (fastest GS), shallowest upwind. Bank constantly changing — not fixed.
- Engine failure after takeoff: best glide first → best field ahead → checklist → if no restart prepare for landing → declare emergency.
- The impossible turn kills. Below ~1,000 ft AGL, accept the field ahead. Every time. No exceptions.